The global .Renviron file contains the internet proxy details to connect RStudio Server Pro to the outside world and to allow you to download and install packages from CRAN.
When you log into RStudio Server Pro for the first time, your home directory does not contain a link to the global .Renviron file. As such, you will be unable to download and install packages.
To create this link, please follow these steps:
- Log into RStudio Server Pro
Open RStudio Server Pro in your web browser of choice and log in.
- Open a Terminal connection
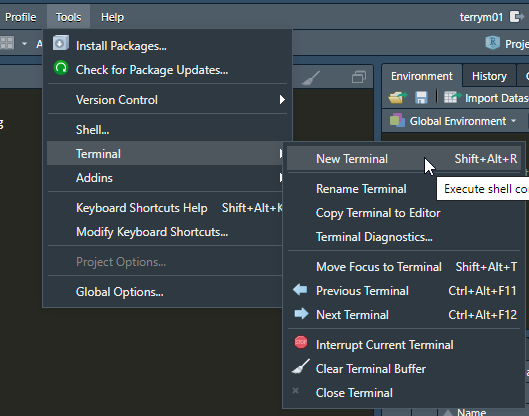
In a new RStudio Server Pro session, open a new Terminal connection by selecting Tools → Terminal → New Terminal.
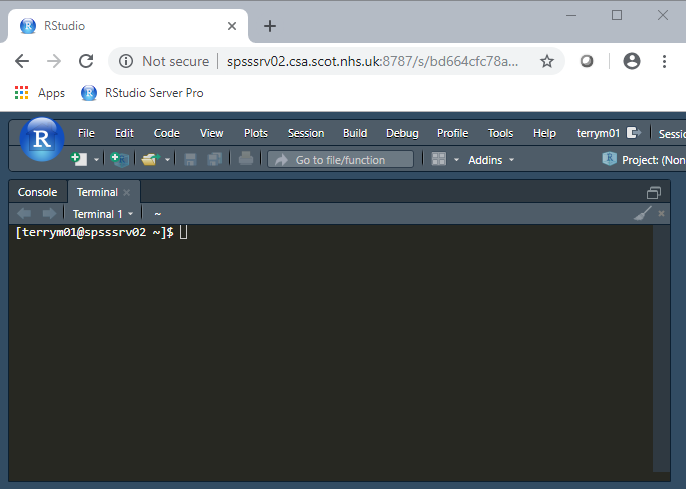
You will now see a blank Terminal prompt:
- Ensure the Terminal is in your home directory on RStudio Server Pro
Type the following command at the terminal prompt, and press the [Enter] key:
cd ~
- Check that the link to the global .Renviron file does not already exist
Type the following command at the Terminal prompt, and press the [Enter] key:
ls -la
This command should return a listing similar to the following:
total 80
drwx------.  13 terrym01 stephen  4096 Jul 12 12:14 .
drwxr-xr-x+ 204 root     root     8192 Oct 10 16:21 ..
-rw-------.   1 terrym01 stephen 27394 Oct 10 08:28 .bash_history
-rw-------.   1 terrym01 stephen    18 Jan 25  2019 .bash_logout
-rw-------.   1 terrym01 stephen   193 Jan 25  2019 .bash_profile
-rw-------.   1 terrym01 stephen   231 Jan 25  2019 .bashrc
Look for a line in the listing returned in your Terminal containing the text .Renviron -> /usr/local/.Renviron, for example:
lrwxrwxrwx. 1 root root 20 Jan 31 2019 .Renviron -> /usr/local/.Renviron
If this line does not exist:
- Create a link to the global .Renviron file
Type the following command at the Terminal prompt, and press the [Enter] key:
ln -s /usr/local/.Renviron
You can confirm that the link has been created by repeating step 4.
Once the link has been created, close your RStudio Server Pro session, log out and then log back in again to confirm that you can now install packages from CRAN.
For some users, RStudio Server Pro is unable to automatically detect where Git is installed. In this case, you have to tell RStudio Server Pro where Git is installed. Please carry out the following steps to ensure that Git is enabled in RStudio Server Pro:
- Log into RStudio Server Pro
Open RStudio Server Pro in your web browser of choice and log in.
- Open the Global Options window
In a new RStudio Server Pro session, open the Global Options window by selecting Tools → Global Options...
- Amend the Git settings
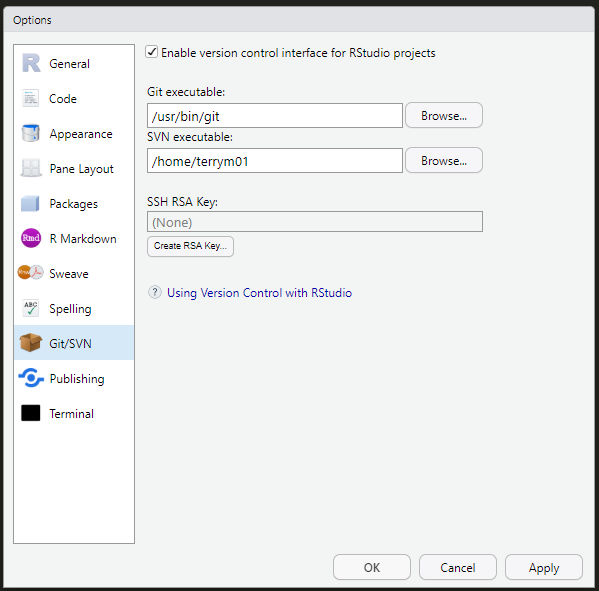
In the Global Options window, select the "Git/SVN" tab from the list on the left hand side, then type
/usr/bin/git
into the text box underneath "Git executable:" e.g.
If the text box already contains this text, then Git is already enabled in RStudio Server Pro.
You may also need to tick the checkbox titled "Enable version control interface for RStudio projects"
Click the "OK" button in the Global Opations window.
Once you have done this, close your RStudio Server Pro session, log out and then log back in again to confirm that you can create a Git-enabled RStudio project through the usual method.


