-
-
Notifications
You must be signed in to change notification settings - Fork 1.3k
Vestax Vci 400
The Vestax VCI-400 is a professional midi controller. It has an integrated sound interface providing various inputs and outputs. A detailed overview of the controller can be found here.
Mixxx supports the VCI-400 from version 1.10 onwards. Please note that only version 1.11 and up support the device out of the box. For version 1.10 the mapping files can be donwloaded from here.
The VCI-400 has been designed to work flexibly with any DJ software. Depending on the software there are buttons and knobs having different functions assigned. Vestax provides overlays for Traktor, Serato, Virtual DJ.
The new VCI-400 mapping for Mixxx is based on the Serato Limited Edition overlay
The new mapping has many advantages over the older mapping: * Full support for four deck control. * Functional effects units and filter knobs. * The 8 quick pads can be put into 4 selectable modes: hot cues, loops, rolls, and samplers. * Support for vinyl control mode selection.
For regular use, make sure the "mixer select" switches are all the way to the left. If you move them to the right, the Play / Cue buttons will be used to select vinyl control modes instead.
Most of the functions are exactly as they appear on the overlay, and the overlay is very nicely labelled so that's the best place to start.
 (Click for a large image!)
The four small buttons below the grouping of 8 buttons selects which mode the 8 buttons are in. Mixxx remembers which mode is selected on a per-deck basis, so when you toggle the deck-selection switches the mode may change. The button corresponding to the current mode will be lit so you know what mode you're in.
Some of the buttons have special functions in Mixxx
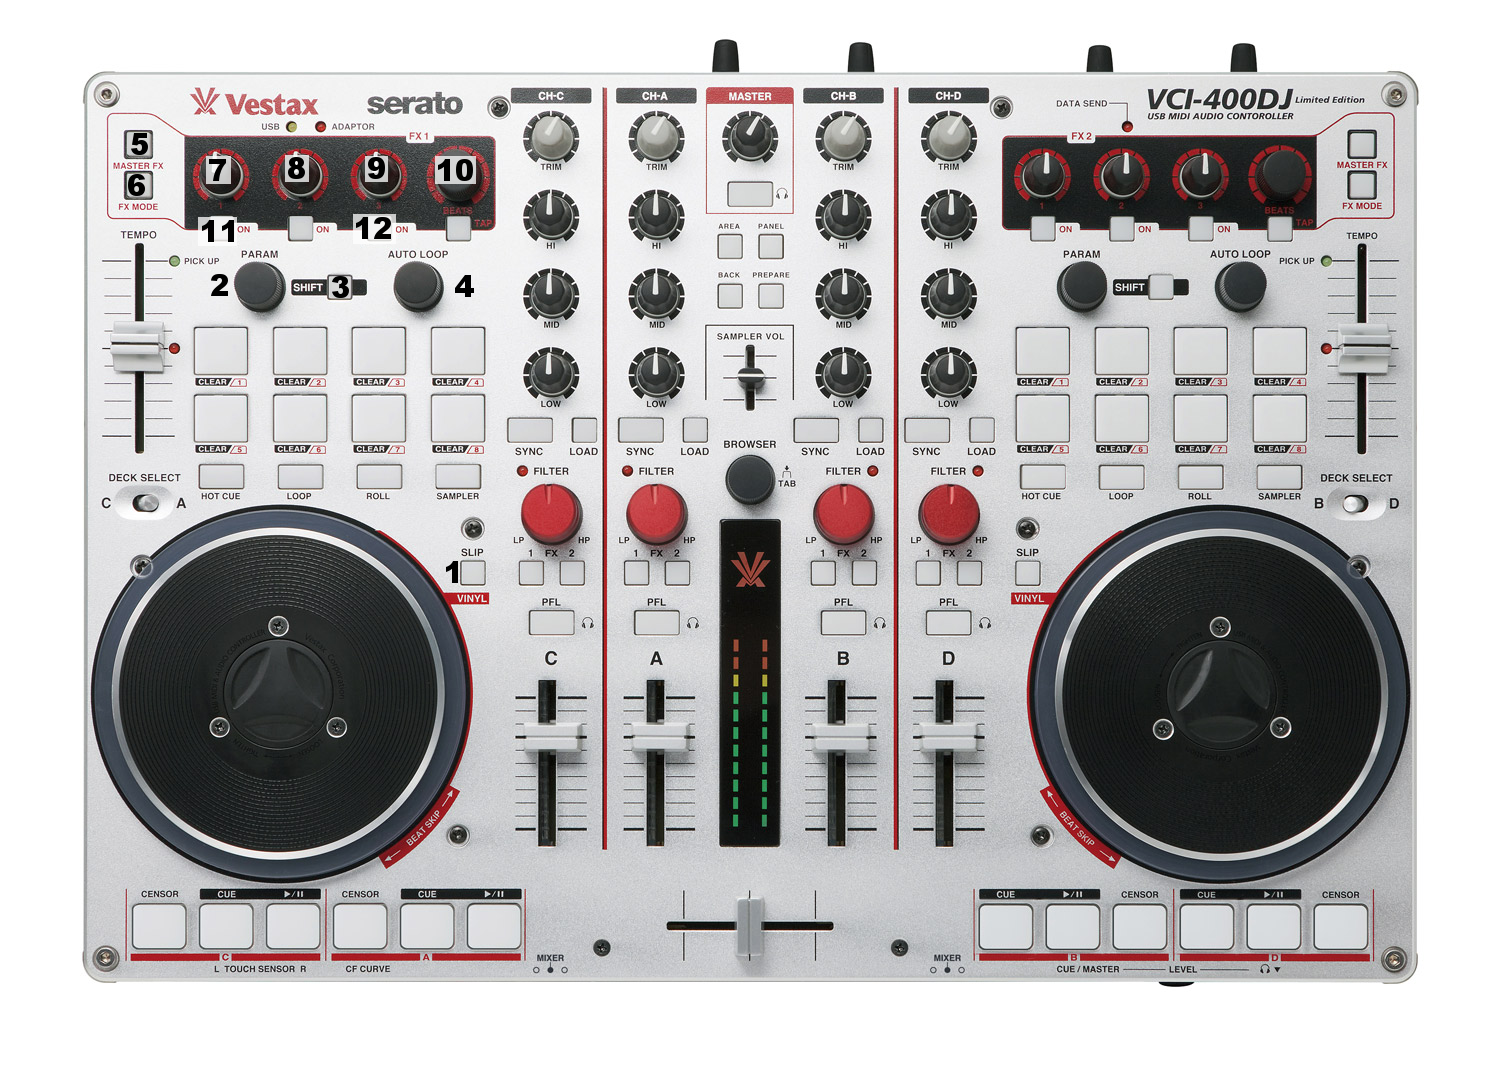
- The Vinyl / Slip button. While pushed, the jog wheel is in scratching mode (similar to if you push down on the platter). If you hold this button while spinning the jog wheel, you can let go of the wheel and Mixxx will still be in scratch mode. Great for backspins.
- The Param knob can be used to adjust the musical key of the current track. Twist to make the tone higher or lower. If you hold the shift button (3), use this knob to scroll quickly through the track. Pushing this knob will reset the key.
- Shift button
- Auto Loop knob. Twisting this will change the size of the current loop, either doubling or halving the size. If you hold shift (3), twisting this knob will move the loop left or right by 1 beat per click. Pushing this knob will enable or disable looping.
- The Master FX button enables the 1st FX bank to be applied to the master output.
- The FX Mode button toggles which effect is in the first FX bank.
- Controls FX1 Parameter 1
- Controls FX1 Parameter 2
- Controls FX1 Parameter 3
- Controls FX1 Dry / Wet
- Eject current track
- Enable/Disable Quantize Mode.
The four small buttons in the center, Area, Panel, Back, and Prepare, don't do anything. Neither does the sampler volume slider.
If you want to use vinyl control instead of the jog wheels, you can move the mixer selection switches all the way to the right. In this mode, the Play button becomes a Vinyl Control Enable/Disable button, and the Cue button selects which Vinyl Control mode is active -- Absolute, Relative, or Constant. The cue button lights up when Absolute is selected.
There's a bug in the way that the VCI400 works -- although Mixxx can control the VU meters, the VCI's internal soundcard always also controls the VU Meters. This can result in an odd flickering effect that looks strange. For this reason, the Master VU meters are disabled by default. If you've installed the firmware that allows decks C and D to act as pass-through mixer channels, you may see flickering there too.
The mapping for older versions of Mixxx were designed to resemble the Traktor overlay.

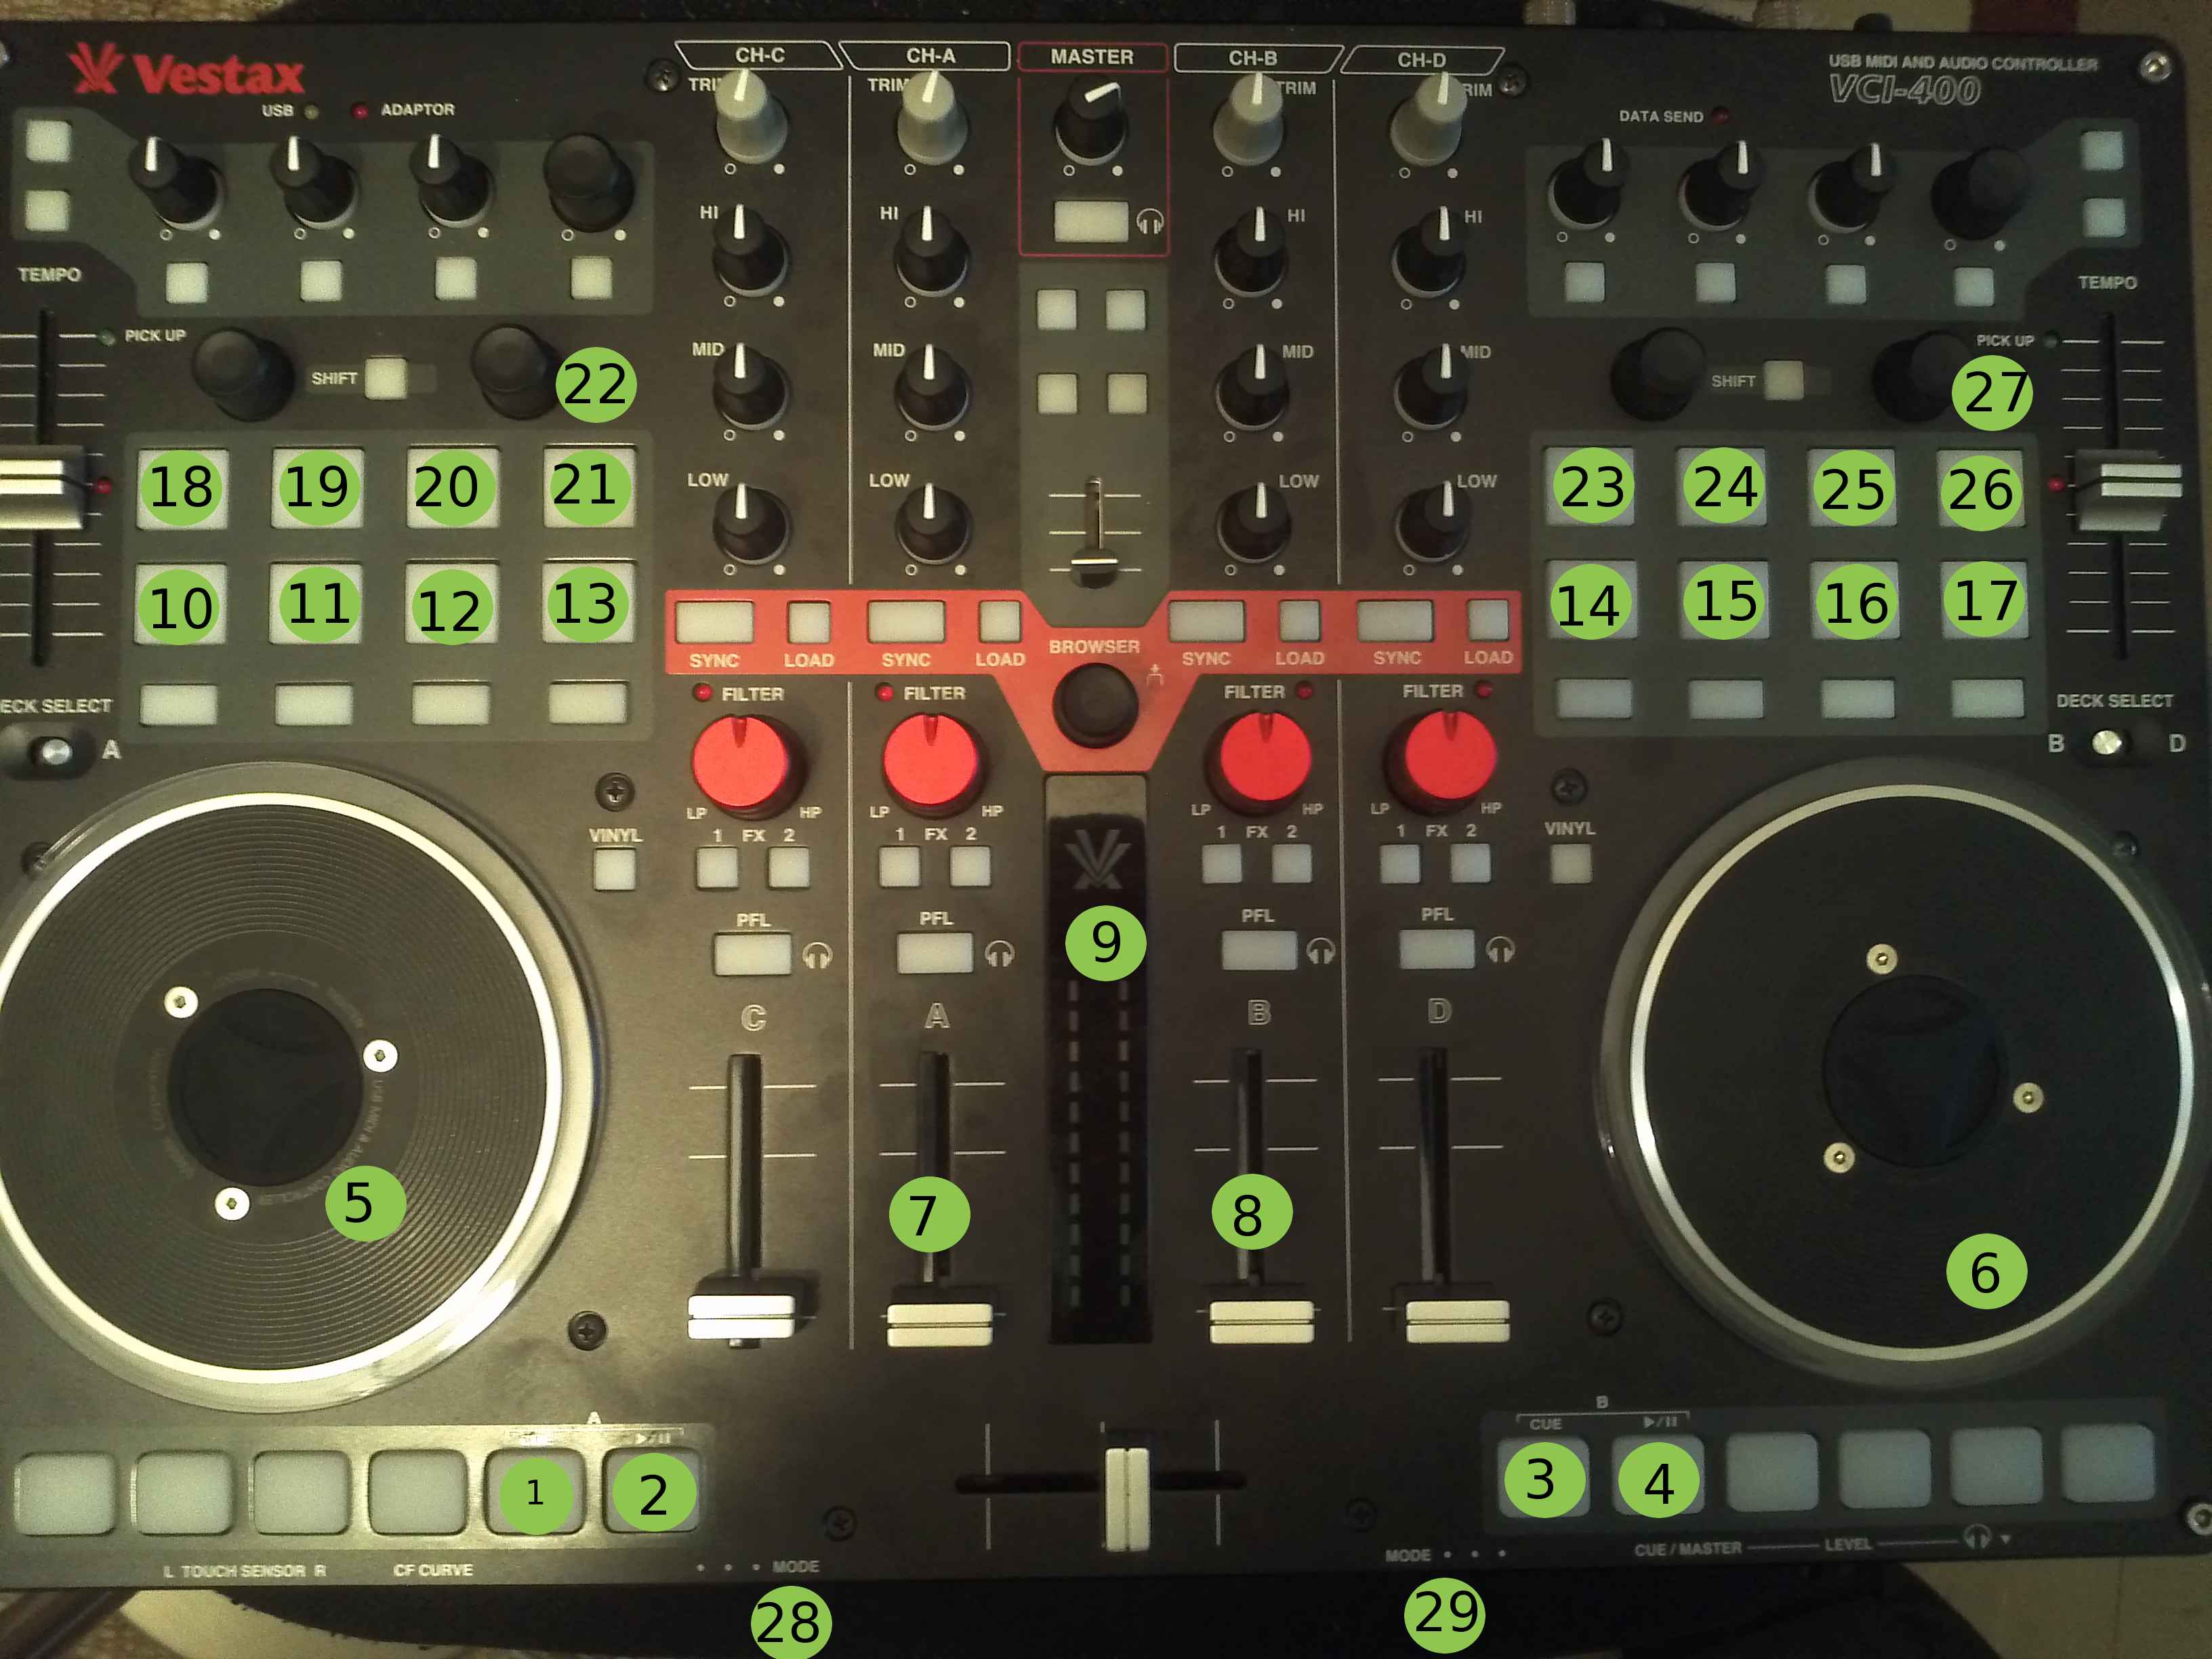
The numbers in the picture above that are surrounded by the green circles visualize the mapped controls. Please note that you must set the MODE switch (control #28 and #29) to the right position, otherwise, the CUE and PLAY buttons will not work.
The device has been mapped as follows:
- CUE button for channel A.
- PLAY button for channel A.
- CUE button for channel B.
- PLAY button for channel B.
- Jog Wheel for channel A used for scratching or pitch bend depending on the VINYL button LED).
- Jog Wheel for channel B used for scratching or pitch bend depending on the VINYL button LED).
- VOLUME fader for channel A.
- Volume fader for channel B.
- VU meters of the master output
- Setting or activating HOT CUE 1 on channel A. To delete the HOT CUE 1, press the button directly below.
- Setting or activating HOT CUE 2 on channel A. To delete the HOT CUE 2, press the button directly below.
- Setting or activating HOT CUE 3 on channel A. To delete the HOT CUE 3, press the button directly below.
- Setting or activating HOT CUE 4 on channel A. To delete the HOT CUE 4, press the button directly below.
- Setting or activating HOT CUE 1 on channel B. To delete the HOT CUE 1, press the button directly below.
- Setting or activating HOT CUE 2 on channel B. To delete the HOT CUE 2, press the button directly below.
- Setting or activating HOT CUE 3 on channel B. To delete the HOT CUE 3, press the button directly below.
- Setting or activating HOT CUE 4 on channel B. To delete the HOT CUE 4, press the button directly below.
- Jump 4 beats back on channel A (not implemented yet).
- Jump over the next 4 beats on channel A (not implemenetd yet).
- Loop In on channel A.
- Loop Out / Loop Exit on channel A.
- Push the button/wheel to set a loop over 4 beats on channel A. Rotate the wheel to double or halve the loop.
- Jump 4 beats back on channel B (not implemented yet).
- Jump over the next 4 beats on channel B (not implemenetd yet).
- Loop In on channel B.
- Loop Out / Loop Exit on channel B.
- Push the button/wheel to set a loop over 4 beats on channel B. Rotate the wheel to double or halve the loop.
- MODE Switch: Must be set to right position, otherwise PLAY and CUE on channel A will not work.
- MODE Switch: Must be set to right position, otherwise PLAY and CUE on channel B will not work.
Mixxx is a free and open-source DJ software.
Manual
Hardware Compatibility
Reporting Bugs
Getting Involved
Contribution Guidelines
Coding Guidelines
Using Git
Developer Guide
Creating Skins
Contributing Mappings
Mixxx Controls
MIDI Scripting
Components JS
HID Scripting
