-
Notifications
You must be signed in to change notification settings - Fork 210
New issue
Have a question about this project? Sign up for a free GitHub account to open an issue and contact its maintainers and the community.
By clicking “Sign up for GitHub”, you agree to our terms of service and privacy statement. We’ll occasionally send you account related emails.
Already on GitHub? Sign in to your account
what should I set ldim to? #26
Comments
|
full code for reference: import pico from './pico.js'
import { decode } from 'https://deno.land/x/[email protected]/mod.ts'
const facefinder_bytes = await Deno.readFile('./examples/facefinder')
const facefinder_classify_region = pico.unpack_cascade(facefinder_bytes)
/**
* a function to transform an RGBA image to grayscale
*/
function rgba_to_grayscale(rgba, nrows, ncols) {
var gray = new Uint8Array(nrows * ncols)
for (var r = 0; r < nrows; ++r)
for (var c = 0; c < ncols; ++c)
// gray = 0.2*red + 0.7*green + 0.1*blue
gray[r * ncols + c] =
(2 * rgba[r * 4 * ncols + 4 * c + 0] +
7 * rgba[r * 4 * ncols + 4 * c + 1] +
1 * rgba[r * 4 * ncols + 4 * c + 2]) /
10
return gray
}
async function find_face(image_filepath: string, stride?: number) {
const raw = await Deno.readFile(image_filepath)
const image_data = decode(raw)
// const image_data = image_data_flat.reduce((acc, ))
// console.log(image_data)
const grey_image_data = rgba_to_grayscale(image_data, image_data.height, image_data.width)
// console.log(image_data.height, image_data.width)
const image = {
pixels: rgba_to_grayscale(image_data, image_data.height, image_data.width),
nrows: image_data.height,
ncols: image_data.width,
// ldim: image_data.width // ? TODO
ldim: stride ?? image_data.width
}
const params = {
shiftfactor: 0.1, // move the detection window by 10% of its size
minsize: 20, // minimum size of a face (not suitable for real-time detection, set it to 100 in that case)
maxsize: 1000, // maximum size of a face
scalefactor: 1.1 // for multiscale processing: resize the detection window by 10% when moving to the higher scale
}
// run the cascade over the image
// detections is an array that contains (r, c, s, q) quadruplets
// (representing row, column, scale and detection score)
let detections = pico.run_cascade(image, facefinder_classify_region, params)
// cluster the obtained detections
detections = pico.cluster_detections(detections, 0.2) // set IoU threshold to 0.2
// draw results
const qthresh = 5.0 // this constant is empirical: other cascades might require a different one
// this just draws the rectangles to help visualize. It is not relevant to the face tracking
const rectangles = detections.map(([x, y, w, h]) => `rectangle ${x},${y} ${w},${h}`).join(' ')
const proc = Deno.run({
cmd: [
'convert',
image_filepath,
'-fill',
'none',
'-stroke',
'red',
'-draw',
rectangles,
'preview.jpg'
]
})
const result = await proc.status()
if (!result.success) Deno.exit(1)
console.log(image_filepath, `(${image_data.width}x${image_data.height})`, 'found', detections.length, 'faces with ldim', image.ldim)
return detections
}
// 419 feels extremely arbitrary
await find_face('./samples/6627147.jpeg', 400)
await find_face('./samples/6627147.jpeg', 419)
await find_face('./samples/6627147.jpeg', 420)
await find_face('./samples/6627147.jpeg', 480)this code is written for deno, the imported pico object is the same one provided by https://github.com/nenadmarkus/picojs |
|
The pixel intensity values of the image are accessed as In some cases, Understand that |
|
ah. Thanks for the explanation. Is there a chance fiddling with any of the other defaults would help? In the final product I will in fact be using this with frames extracted from a video to zoom-pan to the face so hopefully this will be less of an issue |
|
You can try reducing |
(cross posting from nenadmarkus/picojs#33, since this has more to do with the underlying implementation, and less to do with the javascript framework)
Hi, I want to use pico to find faces on images of arbitrary width/height. I am hoping there is some sort of general rule I can uses for setting the
ldimparameter based on image width & height. I have read over the explanation doc https://nenadmarkus.com/p/picojs-intro/From what I gather from the examples, it is usually set to the
ncolsparameter (a.k.a image width). However, I have an example image that is 400x400 pixels. Setting these params:This results in zero detections. Setting
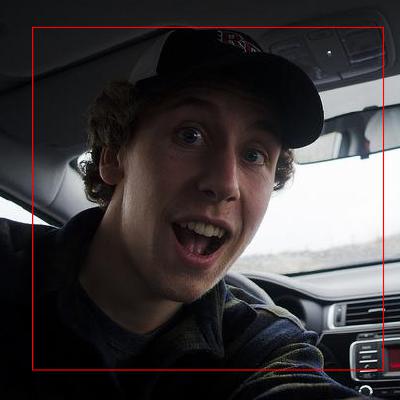
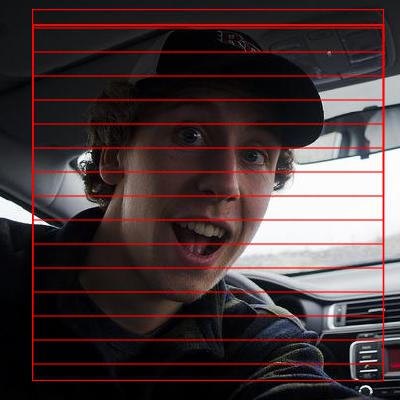
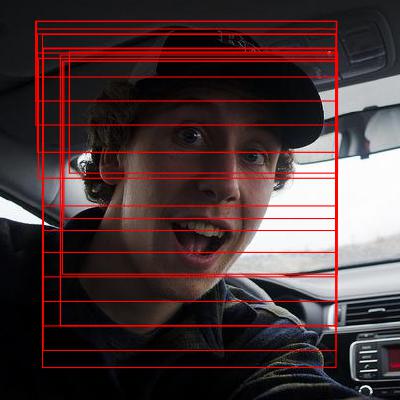
ldimto the seemingly arbitrary value of419results in one detection (which is the desired result). Settingldimto anything higher results in several detections all correspoding to the same face.All the other parameters have values taken from examples/image.html


ldim: 400(the image width):ldim: 419(the desired result):ldim: 420:ldim: 480:The text was updated successfully, but these errors were encountered: