-
Notifications
You must be signed in to change notification settings - Fork 218
HOW TO
This short tutorial will focus on achieving the most basic functionality with NavMeshPlus - NavMesh Extensions System for 2D games, by using NavigationCollectSources2d and NavigationModifier extension components.
To begin with, Create a new project from Unity's "2D Template". Download NavMeshPlus and copy NavMeshComponents into your Assets folder.
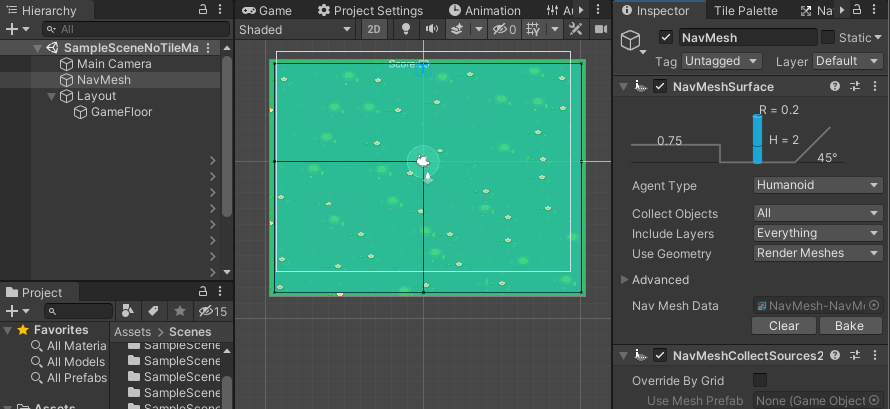
Now, in your scene, right click and select Create Empty from a menu to add an empty GameObject into scene's root. Name your new empty GameObject, for example as "NavMesh".
Create a new root GameObject named "Layout" where we will store our level layout and add child GameObject as "GameFloor". Drop any sprite onto "GameFloor", SpriteRenderer component will be automatically added, now add NavigationModifier component to the object to mark it as Navigation source.
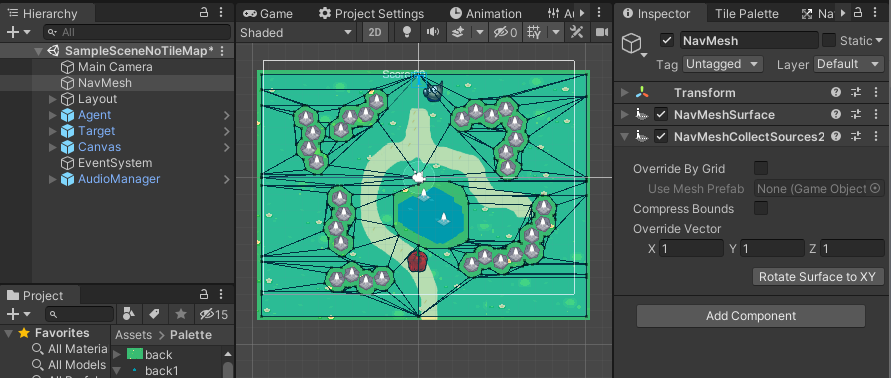
With your "NavMesh" object selected, in the inspector click Add Component and choose NavigationSurface. If you hit bake nothing will happen, cause we need to add another component NavigationCollectSources2d, click Rotate Surface to XY and then Bake to bake walkable plain.

Now add another object to "Layout", call it "Pond", drop new smaller sprite and similarly click Add Component, choose a NavigationModifier component. In the NavigationModifier component check Override Area and in the Area Type field choose Not Walkable. Now hit Bake again (within the "NavMesh" object). You should see that the "Pond" have been carved out of the Navigation areas.

At this point, you can add GameObjects with a NavMeshAgent component, which are capable of interacting with (i.e., walking on) your NavMesh.
By default NavMeshAgent component tends to rotate the GameObject as soon as you hit play. This can be undesirable (as in, your object may be rotate away from your plane of view and hence become invisible), so you should fix its rotation by adding something like the following to a new or existing script:
	void Start()	{
		var agent = GetComponent<NavMeshAgent>();
		agent.updateRotation = false;
		agent.updateUpAxis = false;
	}
Once this is added to the Start method for all of your agents, you are ready for action.

Important note: Currently there is no way to define world bound except to introduce explicit world bound GameObject with NavigationModifier
With new API introduced in Unity 2019.3 there is an ability to choose which geometry source to use. Place all 2D colliders with NavigationModifier added into "Layout" GameObject as child, change Use Geometry option from Render Meshes to Physics Colliders and hit bake.

Important note: It is discovered in the Unity Docs for the CreateMesh method that the EdgeCollider2d will create a mesh if it has an edgeRadius set.
Important note: By default Use Geometry option is set to Render Meshes, which mean NavigationSurface use sprite's Mesh to build its navigation surface, so surface will stick to sprite "outline".
The other option available is Physics Colliders, this option allows navmesh to build surface form 2D colliders polygons. Options are mutually exclusive.
With NavigationCollectSources2d you can bake objects that are a part of Tilemap system.
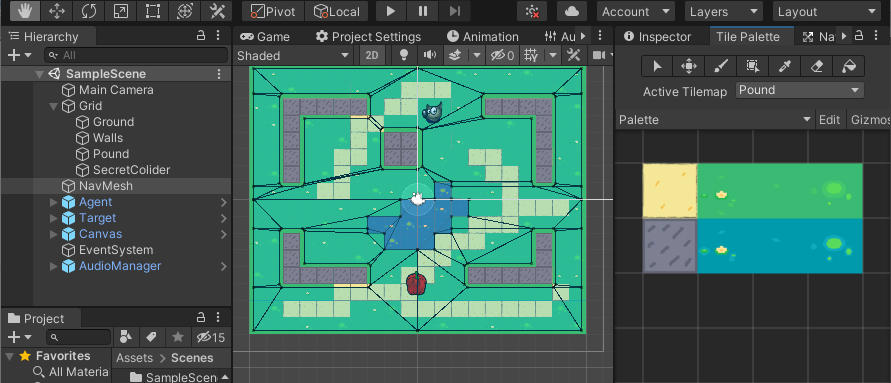
Add a Tilemap GameObject to your scene (By right-clicking your Scene hierarchy and choosing the 2D Object folder, and then Tilemap within). It should create a Grid object in the root of your scene and child Tilemap game object. Add two more Tilemaps (for a total of 3) and and name them "Ground", "Walls" and "Pond".
Using sprites imported into your palette, choose "Ground" as the Active Tile Map, and paint the ground in your scene view. Change Active Tile Map in your palette to "Walls" to paint some obstacles. Then select "Pond" and do the same, drawing a body of water. As with basics navmesh add NavigationModifier to each of tilemaps, override its areas to walkable and not-walkable respectively. Bake the navmesh.

As each Tile represent properties of the world it is possible to assign navigation modifier to each tile in TileSet. To do that use NavigationModifier and NavigationModifierTilemap on asingle Tilemap paited form existing tilest. Add new element to the list inside NavigationModifierTilemap and chosse tile from assets. Now overide each tile on top of NavigationModifier, or leave as it is.

Hit bake and get seme result as in chapter above, exept with no layers on a single TileMap.
Another common task is not to carve out obstacles, but to navigate through a maze, where our agents can only follow a strict path. To do that, Bake your "NavMesh" with Default Area selected to Not Walkable, and the NavigationModifier component set to be Walkable, and you will get this:

Any sprite within the Grid object with a NavigationModifier will be added into Bake process. (Sprite must have a mesh). You can build bridges or barricades, and these objects will be added into your NavMesh as static data.
Some games want to use hexagonal, isometric, or diamond-shaped grids. NavMeshPlus supports baking other types of grid as well, as long as spites share the shape as your grid.

In some cases the sprite can differ from your grid shape, it may have excessive outline or be concave. When we want clean navigation though the tilemap we need clean to up hundred sprites of different shapes. To streamline tedious editing of each sprites outline we can override sprite mesh altogether.
First we need to have a mesh that has the shape of a tile. For this hexagonal tile example, we'll import a mesh shaped like a hexagon. (Use Blender or any other 3D software)
Add your hexagon to the scene, rotate it to face the camera and scale it down to match the size of your cells.
In the NavigationCollectSources2d component, check Override By Grid and add prefab. Hit Bake.

Important Note: If we remove the prefab and leave the override option active, all tiles will be considered as squares. Which is great for performance.
Often games have procedural world building which requires bake NavMesh at runtime. To achieve this you need to call a single method BuildNavMeshAsync inNavigationSurface component to bake NavMesh at runtime in Unity async manner. This method can be called on Start() method.
	public NavMeshSurface Surface2D;

	void Start()
	{
		Surface2D.BuildNavMeshAsync();
	}
For dynamic worlds to save some CPU utilization we can call UpdateNavMesh instead of building NavMesh every frame. Code may looks like:
    public NavMeshSurface Surface2D;

    void Update()
    {
        Surface2D.UpdateNavMesh(Surface2D.navMeshData);
    }
But it does not cache collected 2D sources between updates, so you might use its internal method with your cacheing mechanism:
NavMeshBuilder.UpdateNavMeshDataAsync(data, GetBuildSettings(), sources, sourcesBounds); Also to save some CPU cycles consider to use NavigationCollectRootSources2d to specify navmesh root sources explicitly.

Important note: Collider's bounds not getting updated to match the transform until 'LateUpdate()' is called. Force the update by calling Physics2D.SyncTransforms() before calling 'BuildNavMesh()' if you baking navmesh at runtime.
Important note: Physics updated only in fixed update, that is running in different time period than regular update. So its is not possible to generate physics in Awake/Start and call 'BuildNavMesh()' before 'LateUpdate()' to bake new geometry at runtime.
More samples can be found in "NavMeshComponents" repository on GitHub and NavMeshBuilder methods documentation at Unity site
The agent gets stuck while moving on Y axes, or setting agent. Velocity doesn't do anything if x=0_ - it seems to be a bug in NavMeshAgent component. There is no fix available right now, but there are workarounds. The idea of workaround is simple, adjust Agent movement on X so its never straight up.
Navmesh can have a small tilt 89.98 to make agent work.
If for some reason its doesnt sove the problem, you need add a drift. Here is a snippet for SetDestination():
   satic float agentDrift = 0.0001f; // minimal
   void SetDestination(GameObject target)
    {
		if(Mathf.abs(transform.position.x - target.transform.position.x) < agentDrift)
        var driftPos = target.transform.position + new Vector3(agentDrift, 0f, 0f);
        agent.SetDestination(driftPos);
}Try out a fully-featured 2D "run-and-chase" game I made to demo NavMesh 2D: [RedHotSweetPepper].

References:
- NavMeshSurface - https://docs.unity3d.com/Manual/class-NavMeshSurface.html
- NavMeshSurface Extensions - https://github.com/h8man/NavMeshPlus
- The Game Demo - https://github.com/h8man/RedHotSweetPepper
- Forum to discuss - https://forum.unity.com/threads/2d-navmesh-pathfinding.503596/
- NavMeshComponents Runtime - https://github.com/Unity-Technologies/NavMeshComponents/tree/master/Assets/Examples/Scenes