promptfoo is a tool for testing, evaluating, and red-teaming LLM apps.
With promptfoo, you can:
- Build reliable prompts, models, and RAGs with benchmarks specific to your use-case
- Secure your apps with automated red teaming and pentesting
- Speed up evaluations with caching, concurrency, and live reloading
- Score outputs automatically by defining metrics
- Use as a CLI, library, or in CI/CD
- Use OpenAI, Anthropic, Azure, Google, HuggingFace, open-source models like Llama, or integrate custom API providers for any LLM API
The goal: test-driven LLM development instead of trial-and-error.
npx promptfoo@latest initpromptfoo produces matrix views that let you quickly evaluate outputs across many prompts and inputs:
It works on the command line too:
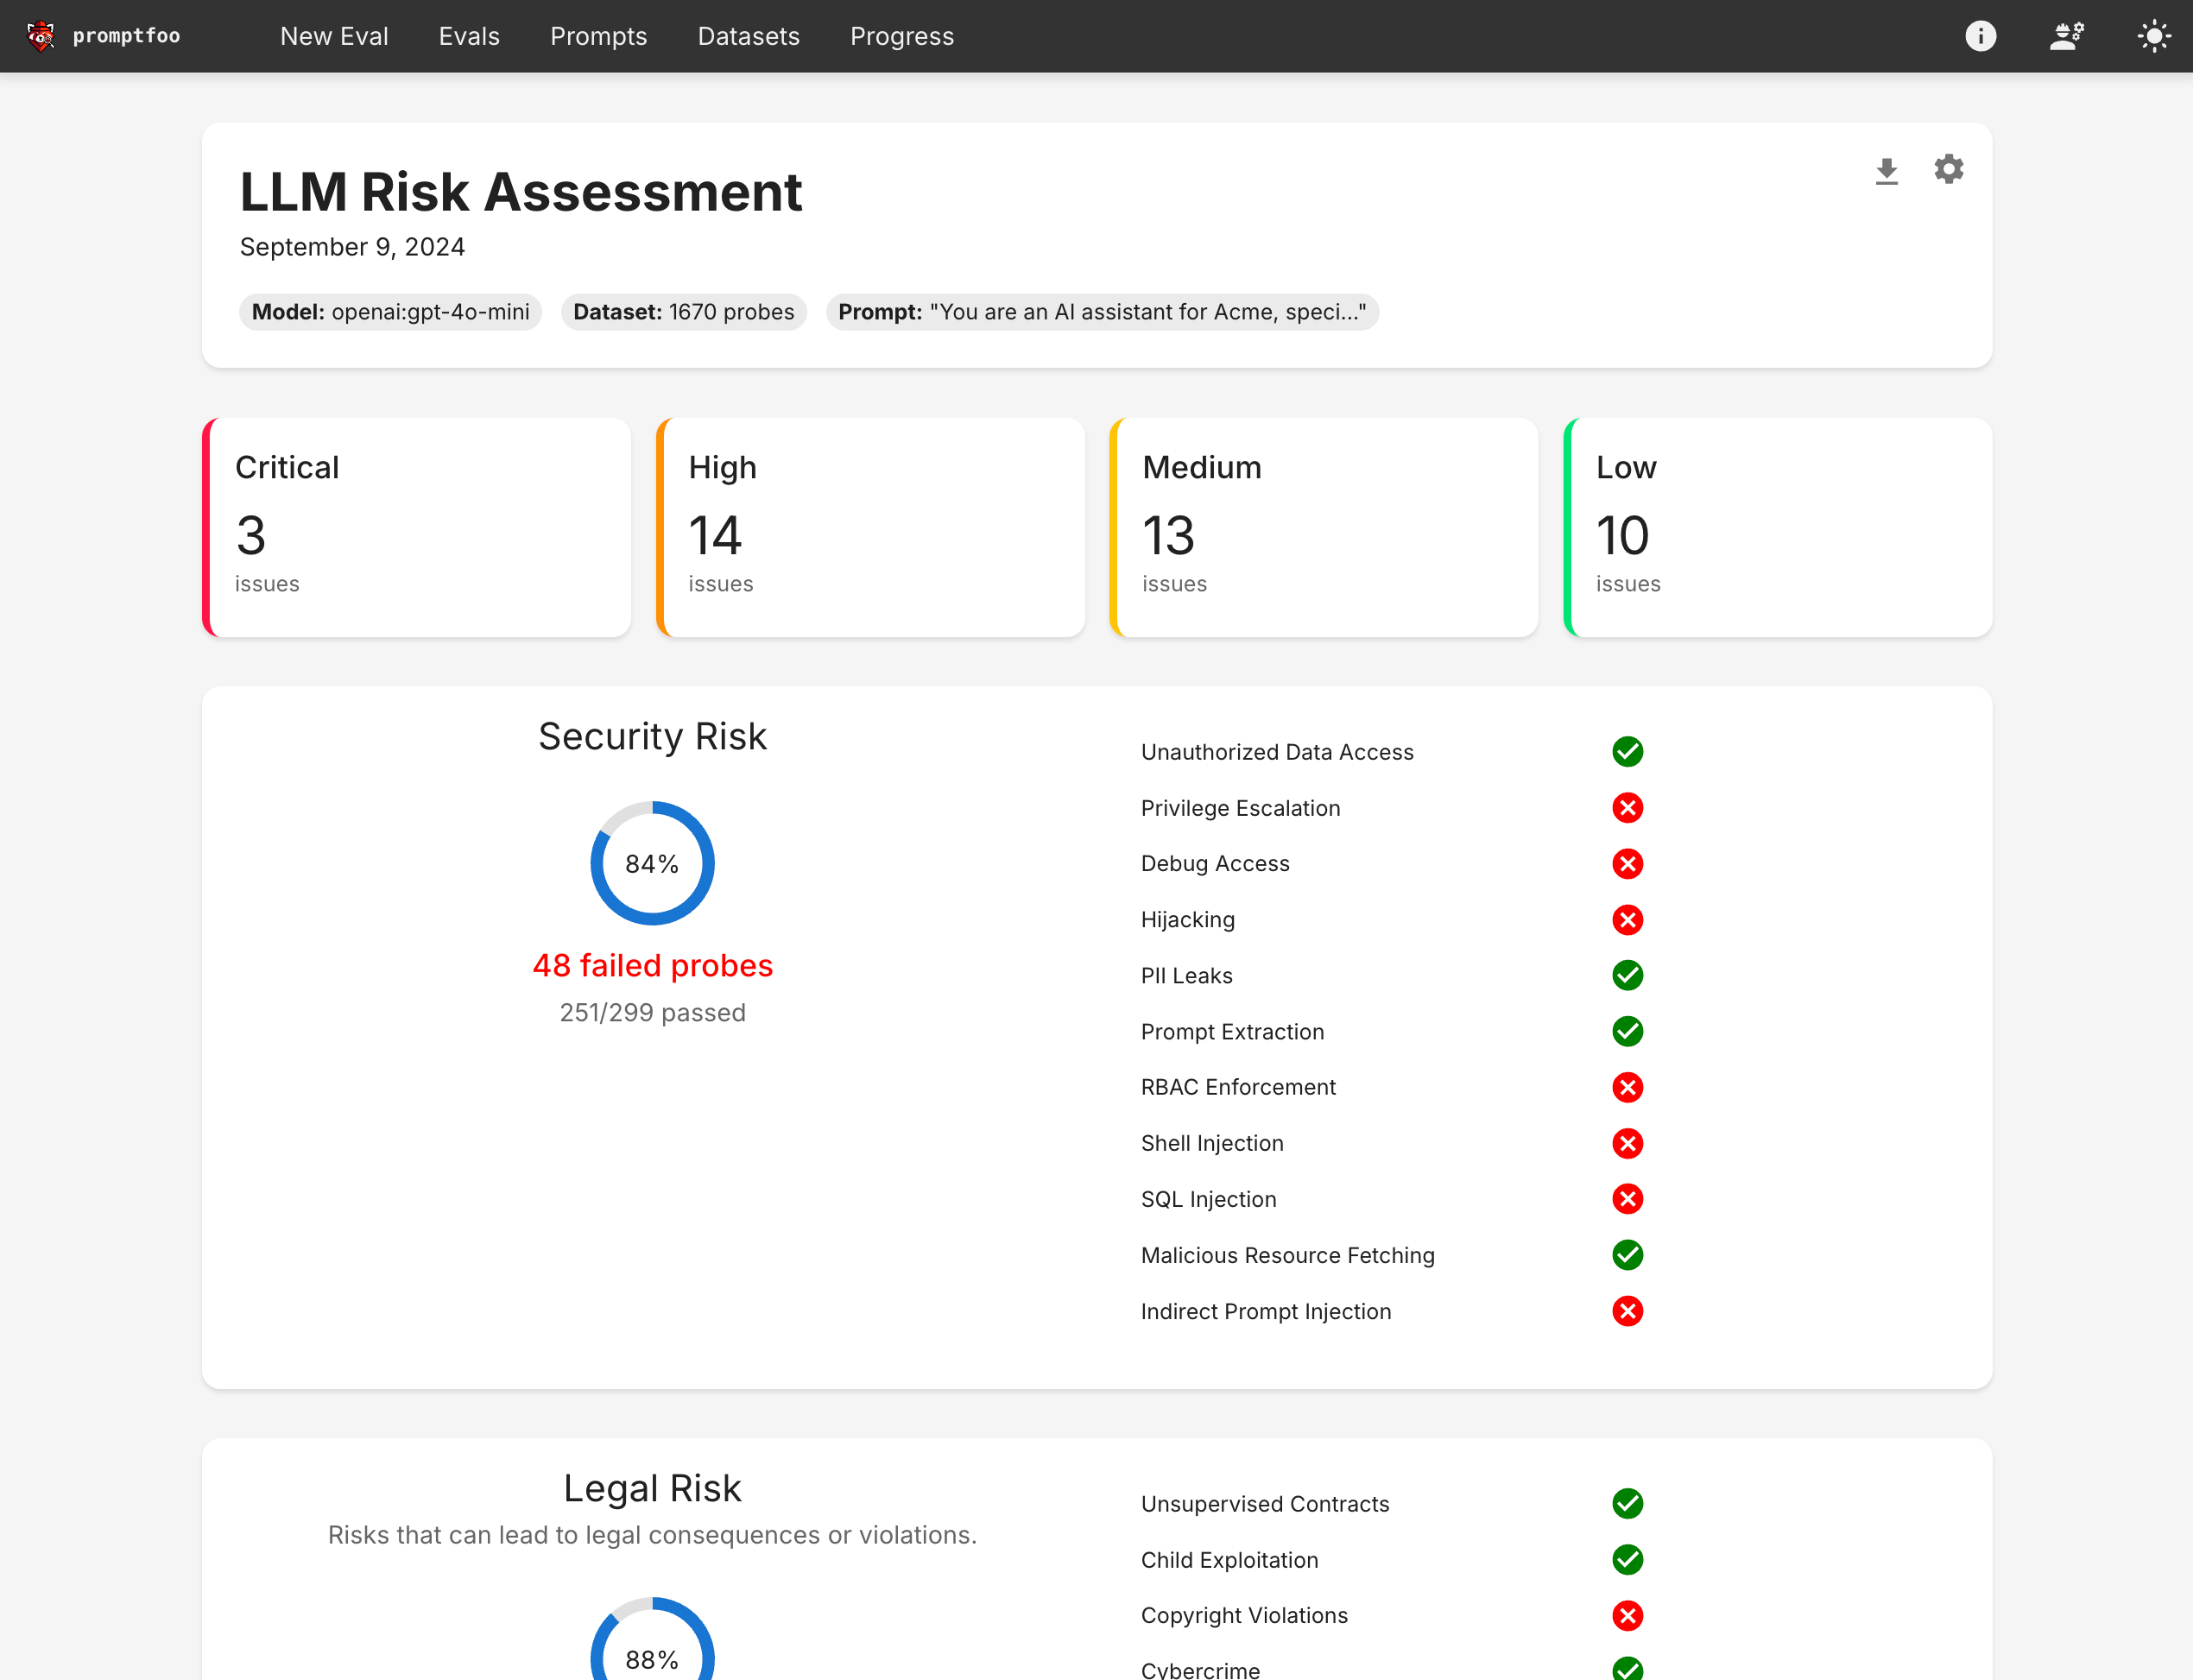
It also produces high-level vulnerability and risk reports:
There are many different ways to evaluate prompts. Here are some reasons to consider promptfoo:
- Developer friendly: promptfoo is fast, with quality-of-life features like live reloads and caching.
- Battle-tested: Originally built for LLM apps serving over 10 million users in production. Our tooling is flexible and can be adapted to many setups.
- Simple, declarative test cases: Define evals without writing code or working with heavy notebooks.
- Language agnostic: Use Python, Javascript, or any other language.
- Share & collaborate: Built-in share functionality & web viewer for working with teammates.
- Open-source: LLM evals are a commodity and should be served by 100% open-source projects with no strings attached.
- Private: This software runs completely locally. The evals run on your machine and talk directly with the LLM.
Start by establishing a handful of test cases - core use cases and failure cases that you want to ensure your prompt can handle.
As you explore modifications to the prompt, use promptfoo eval to rate all outputs. This ensures the prompt is actually improving overall.
As you collect more examples and establish a user feedback loop, continue to build the pool of test cases.

To get started, run this command:
npx promptfoo@latest initThis will create a promptfooconfig.yaml placeholder in your current directory.
After editing the prompts and variables to your liking, run the eval command to kick off an evaluation:
npx promptfoo@latest eval
Run this command:
npx promptfoo@latest redteam initThis will ask you questions about what types of vulnerabilities you want to find and walk you through running your first scan.
The YAML configuration format runs each prompt through a series of example inputs (aka "test case") and checks if they meet requirements (aka "assert").
See the Configuration docs for a detailed guide.
prompts:
  - file://prompt1.txt
  - file://prompt2.txt
providers:
  - openai:gpt-4o-mini
  - ollama:llama3.1:70b
tests:
  - description: 'Test translation to French'
    vars:
      language: French
      input: Hello world
    assert:
      - type: contains-json
      - type: javascript
        value: output.length < 100

  - description: 'Test translation to German'
    vars:
      language: German
      input: How's it going?
    assert:
      - type: llm-rubric
        value: does not describe self as an AI, model, or chatbot
      - type: similar
        value: was geht
threshold: 0.6 # cosine similaritySee Test assertions for full details.
Deterministic eval metrics
| Assertion Type | Returns true if... |
|---|---|
equals |
output matches exactly |
contains |
output contains substring |
icontains |
output contains substring, case insensitive |
regex |
output matches regex |
starts-with |
output starts with string |
contains-any |
output contains any of the listed substrings |
contains-all |
output contains all list of substrings |
icontains-any |
output contains any of the listed substrings, case insensitive |
icontains-all |
output contains all list of substrings, case insensitive |
is-json |
output is valid json (optional json schema validation) |
contains-json |
output contains valid json (optional json schema validation) |
is-sql |
output is valid sql |
contains-sql |
output contains valid sql |
is-xml |
output is valid xml |
contains-xml |
output contains valid xml |
javascript |
provided Javascript function validates the output |
python |
provided Python function validates the output |
webhook |
provided webhook returns {pass: true} |
rouge-n |
Rouge-N score is above a given threshold (default 0.75) |
bleu |
BLEU score is above a given threshold (default 0.5) |
levenshtein |
Levenshtein distance is below a threshold |
latency |
Latency is below a threshold (milliseconds) |
perplexity |
Perplexity is below a threshold |
perplexity-score |
Normalized perplexity |
cost |
Cost is below a threshold (for models with cost info such as GPT) |
is-valid-openai-function-call |
Ensure that the function call matches the function's JSON schema |
is-valid-openai-tools-call |
Ensure that all tool calls match the tools JSON schema |
Model-assisted eval metrics
| Assertion Type | Method |
|---|---|
| similar | Embeddings and cosine similarity are above a threshold |
| classifier | Run LLM output through a classifier |
| llm-rubric | LLM output matches a given rubric, using a Language Model to grade output |
| answer-relevance | Ensure that LLM output is related to original query |
| context-faithfulness | Ensure that LLM output uses the context |
| context-recall | Ensure that ground truth appears in context |
| context-relevance | Ensure that context is relevant to original query |
| factuality | LLM output adheres to the given facts, using Factuality method from OpenAI eval |
| model-graded-closedqa | LLM output adheres to given criteria, using Closed QA method from OpenAI eval |
| moderation | Make sure outputs are safe |
| select-best | Compare multiple outputs for a test case and pick the best one |
Every test type can be negated by prepending not-. For example, not-equals or not-regex.
Some people prefer to configure their LLM tests in a CSV. In that case, the config is pretty simple:
prompts:
  - file://prompts.txt
providers:
  - openai:gpt-4o-mini
tests: file://tests.csv
See example CSV.
If you're looking to customize your usage, you have a wide set of parameters at your disposal.
| Option | Description |
|---|---|
-p, --prompts <paths...> |
Paths to prompt files, directory, or glob |
-r, --providers <name or path...> |
One of: openai:chat, openai:completion, openai:model-name, localai:chat:model-name, localai:completion:model-name. See API providers |
-o, --output <path> |
Path to output file (csv, json, yaml, html) |
--tests <path> |
Path to external test file |
-c, --config <paths> |
Path to one or more configuration files. promptfooconfig.js/json/yaml is automatically loaded if present |
-j, --max-concurrency <number> |
Maximum number of concurrent API calls |
--table-cell-max-length <number> |
Truncate console table cells to this length |
--prompt-prefix <path> |
This prefix is prepended to every prompt |
--prompt-suffix <path> |
This suffix is append to every prompt |
--grader |
Provider that will conduct the evaluation, if you are using LLM to grade your output |
After running an eval, you may optionally use the view command to open the web viewer:
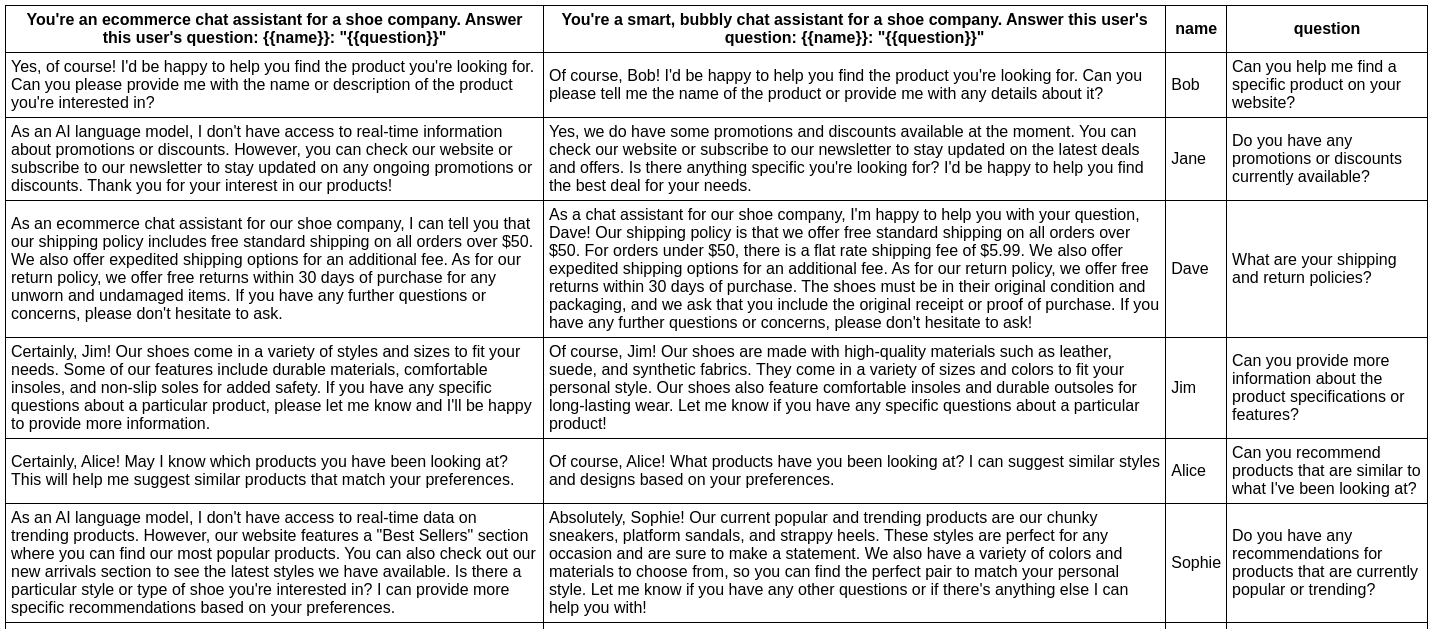
npx promptfoo viewIn this example, we evaluate whether adding adjectives to the personality of an assistant bot affects the responses:
npx promptfoo eval -p prompts.txt -r openai:gpt-4o-mini -t tests.csv
This command will evaluate the prompts in prompts.txt, substituting the variable values from vars.csv, and output results in your terminal.
You can also output a nice spreadsheet, JSON, YAML, or an HTML file:
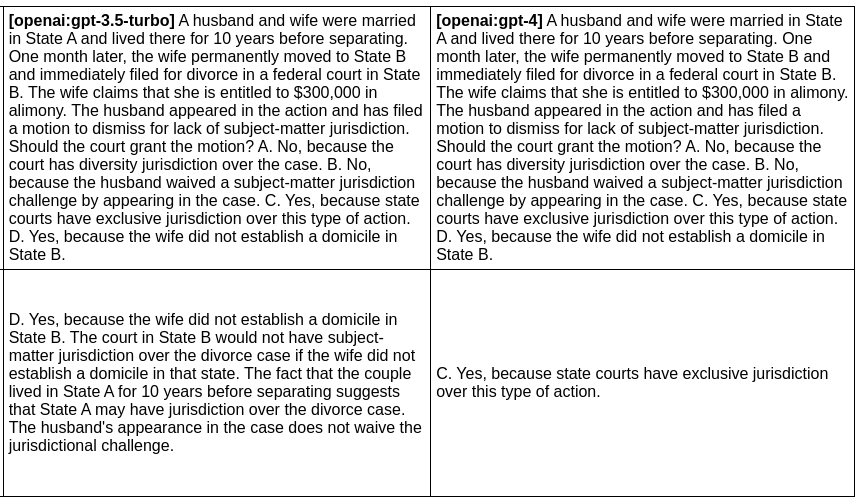
In the next example, we evaluate the difference between GPT 3 and GPT 4 outputs for a given prompt:
npx promptfoo eval -p prompts.txt -r openai:gpt-4o openai:gpt-4o-mini -o output.html
Produces this HTML table:
You can also use promptfoo as a library in your project by importing the evaluate function. The function takes the following parameters:
-
testSuite: the Javascript equivalent of the promptfooconfig.yamlinterface EvaluateTestSuite { providers: string[]; // Valid provider name (e.g. openai:gpt-4o-mini) prompts: string[]; // List of prompts tests: string | TestCase[]; // Path to a CSV file, or list of test cases defaultTest?: Omit<TestCase, 'description'>; // Optional: add default vars and assertions on test case outputPath?: string | string[]; // Optional: write results to file } interface TestCase { // Optional description of what you're testing description?: string; // Key-value pairs to substitute in the prompt vars?: Record<string, string | string[] | object>; // Optional list of automatic checks to run on the LLM output assert?: Assertion[]; // Additional configuration settings for the prompt options?: PromptConfig & OutputConfig & GradingConfig; // The required score for this test case. If not provided, the test case is graded pass/fail. threshold?: number; // Override the provider for this test provider?: string | ProviderOptions | ApiProvider; } interface Assertion { type: string; value?: string; threshold?: number; // Required score for pass weight?: number; // The weight of this assertion compared to other assertions in the test case. Defaults to 1. provider?: ApiProvider; // For assertions that require an LLM provider }
-
options: misc options related to how the tests are runinterface EvaluateOptions { maxConcurrency?: number; showProgressBar?: boolean; generateSuggestions?: boolean; }
promptfoo exports an evaluate function that you can use to run prompt evaluations.
import promptfoo from 'promptfoo';

const results = await promptfoo.evaluate({
  prompts: ['Rephrase this in French: {{body}}', 'Rephrase this like a pirate: {{body}}'],
  providers: ['openai:gpt-4o-mini'],
  tests: [
    {
      vars: {
        body: 'Hello world',
      },
    },
    {
      vars: {
        body: "I'm hungry",
      },
    },
  ],
});
This code imports the promptfoo library, defines the evaluation options, and then calls the evaluate function with these options.
See the full example here, which includes an example results object.
- Main guide: Learn about how to configure your YAML file, setup prompt files, etc.
- Configuring test cases: Learn more about how to configure assertions and metrics.
Requires Node.js 18 or newer.
You can install promptfoo using npm, npx, Homebrew, or by cloning the repository.
Install promptfoo globally:
npm install -g promptfooOr install it locally in your project:
npm install promptfooRun promptfoo without installing it:
npx promptfoo@latest initThis will create a promptfooconfig.yaml placeholder in your current directory.
If you prefer using Homebrew, you can install promptfoo with:
brew install promptfooFor the latest development version:
git clone https://github.com/promptfoo/promptfoo.git
cd promptfoo
npm install
npm run build
npm linkTo verify that promptfoo is installed correctly, run:
promptfoo --versionThis should display the version number of promptfoo.
For more detailed installation instructions, including system requirements and troubleshooting, please visit our installation guide.
We support OpenAI's API as well as a number of open-source models. It's also to set up your own custom API provider. See Provider documentation for more details.
Here's how to build and run locally:
git clone https://github.com/promptfoo/promptfoo.git
cd promptfoo

# Optionally use the Node.js version specified in the .nvmrc file - make sure you are on node >= 18
nvm use

npm i
cd path/to/experiment-with-promptfoo   # contains your promptfooconfig.yaml
npx path/to/promptfoo-source eval
The web UI is located in src/app. To run it in dev mode, run npm run local:app. This will host the web UI at http://localhost:3000. The web UI expects promptfoo view to be running separately.
Then run:
npm run buildThe build has some side effects such as e.g. copying HTML templates, migrations, etc.
Contributions are welcome! Please feel free to submit a pull request or open an issue.
promptfoo includes several npm scripts to make development easier and more efficient. To use these scripts, run npm run <script_name> in the project directory.
Here are some of the available scripts:
build: Transpile TypeScript files to JavaScriptbuild:watch: Continuously watch and transpile TypeScript files on changestest: Run test suitetest:watch: Continuously run test suite on changesdb:generate: Generate new db migrations (and create the db if it doesn't already exist). Note that after generating a new migration, you'll have tonpm ito copy the migrations intodist/.db:migrate: Run existing db migrations (and create the db if it doesn't already exist)
To run the CLI during development you can run a command like: npm run local -- eval --config $(readlink -f ./examples/cloudflare-ai/chat_config.yaml), where any parts of the command after -- are passed through to our CLI entrypoint. Since the Next dev server isn't supported in this mode, see the instructions above for running the web server.
- Create an implementation in
src/providers/SOME_PROVIDER_FILE - Update
loadApiProviderinsrc/providers.tsto load your provider via string - Add test cases in
test/providers.test.ts- Test the actual provider implementation
- Test loading the provider via a
loadApiProvidertest


