-
Notifications
You must be signed in to change notification settings - Fork 50
UserGuide
 |
is brought to you by |  |
Because of the conversion from Google Code to GitHub, there are likely cross-wiki links that may be broken. Please report to [email protected] any errors you find in the documentation and we'll get it fixed ASAP. Thank you!
- Concepts, Tips & Tricks (Read first)
- User's Guide (Read first) (this guide)
- System Administrator's Guide
- Point & Click Programming Guide
- Reports and Transaction Setup Guide
- Point & Click Programming Integration API Guide
- Point & Click Programming Tutorial
This guide describes common functions performed by all users. See the System Administrator Guide for details on setting up users and configuring the system, or the Point & Click Programming Guide for programming documents, packages, transactions and reports.
Note that not all menu items are authorized to all users. If you do not see the item in your menu when you login, you either are not authorized, or you should contact our system administrator so that you are given permission to access that function.
All users log in on a page that is distinct for your deployment. Unlike other services, each customer or company has its own distinct web application and database to allow for easy migration from shared hosting, to private hosting, to your own server. Also, this reduces any accidental data leaks or exposure of private data due to hacking attacks or unauthorized access that result from poor security habits of others. Sadly, large systems with millions of users become valuable targets to thieves and hackers.
Contact your system administrator if you need a new account so you can login, cannot reset your own password through the 'Forgot your password?' process, or for the web address (URL) to use for your deployment. When a new user account is created, an email will be sent to your login email address allowing you to choose a new password, as well as set up a forgotten password question and answer.
For those who need or want two-factor authentication (2FA), eSignForms supports both Twilio Authy or Amazon SNS for SMS for this purpose.
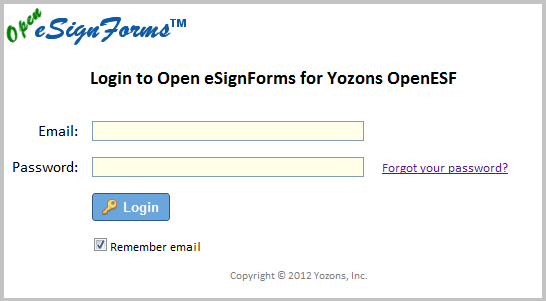
A typical login page looks like this:
Your company's logo will appear at the top, along with your company name in the heading.
Enter your email address and password, then click the Login button. A password can be as long as a 100-character pass phrase that includes letters, numbers, spaces and special characters. It is case sensitive. We recommend at least 10 characters, something you can remember, but others will find impossible to guess.
Check the 'Remember email' box when on your own computer to avoid having to specify it ever time you login.
If you have forgotten your password, click on the Forgot your password? link.
If you have two-factor authentication configured for a given user, an additional field will be displayed to enter the code sent to you via Twilio Authy or a text message sent via Amazon SNS. If you attempt to login without supplying the code, the login will fail with a prompt for the necessary code.
After you login, at the bottom of the web page, it will show when you logged in, when you previously logged, as well as the time when your browser last communicated with the server:
You may want to check the previous login time and IP address to see if any unauthorized logins to your account took place. Also, most user sessions last about 30 minutes, so if your browser has not sent anything in that amount of time, your session will terminate, you will lose any unsaved work, and you'll have to login again. Clicking on anything in the application will likely communicate with the server and keep your session active.
When you login, you will see a welcome screen that includes links you may be interested in, as well as how to ask questions, report bugs, etc. Many pages have useful tips right inside them.
Read more about which industries require 2FA.
If your deployment has enabled Authy 2FA, and your user account has both specified a mobile phone number and been enrolled in Authy, logins and setting a new password will require that you enter the Authy token (6-9 digits, spaces are ignored) for your account. You may use the free Authy mobile app (required), or any of the additional desktop and browser plug-ins to receive the secure token.
Before you've successfully logged in with an Authy token, the login page will not show an input field to enter the token. However, after a successful login using Authy, it will be shown automatically. Regardless, if you login without the token and it's required, you will then be prompted to provide the token. Similarly, if you last logged in without needing a token, that field will be suppressed on subsequent logins.
The Authy token is required whenever you login or set a new password. This token is not checked for any API-based logins.
If your deployment has enabled Amazon SNS for SMS 2FA, and your user account has both specified a mobile phone number and been enrolled for SMS, logins and setting a new password will require that you enter the SMS token for your account that is sent to your mobile phone.
Before you've successfully logged in with an SMS token, the login page will not show an input field to enter the token. However, after a successful login using SMS authentication, it will be shown automatically. Regardless, if you login without the token and it's required, you will then be prompted to provide the token. Similarly, if you last logged in without needing a token, that field will be suppressed on subsequent logins.
The SMS token is required whenever you login or set a new password. This token is not checked for any API-based logins.
Whenever you are done using the application, you should logoff. This not only protects access to your account, but it also frees server resources. Logoff also saves any user interface customizations for the next login session. If you just close your browser, go to another web site (URL) or remain idle for a long period of time, the web server will eventually time out your session, and any user interface customizations are not saved for your next login.
There is a logoff button in the upper right corner.
When you login, the mode and tabs you had open when you last logged off will be shown again. If you are new, you will default to PRODUCTION: Live mode with the Welcome tips tab shown.
The current mode is displayed first in the black menu bar. It's a drop down list so click on it to change modes.
The "normal" mode is PRODUCTION: Live, in which new transactions you start are for your regular needs, and To Do, Reports and Transaction Search return production-mode transactions. Also, when you click Start transaction you will only see transactions suitable for production mode. Each user can be limited to just PRODUCTION mode by checking that box on the user record; that prevents the user from doing development and testing.
Note that the header and footer have a blue background and the mode selector reads Production: Live
In TEST: Like Production mode, you will see a new orange border that will help you understand that you are actually in test mode, albeit for production-level components (package, document, image, drop down, etc. all will use production versions). To Do, reports and transaction search will show only test transactions. When you run To Do or reports you will see a similarly colored orange dotted line appear under the search area to make it clear that the output you see in is for test transactions. This is because if you switch modes and you run reports or the like in different tabs, you will be able to tell easily if you were looking at test/production transactions in those reports.
You should use this mode when testing what your customers/users will see so that you do not pollute your production reports with test transactions.
It is also recommended that when any new or updated transaction is put into production, you do at least one 'Test Like Production' to ensure it is working as you expect. It is possible that some test-level components were not promoted to the production version and this final test will catch that.
In TEST: Development mode, the header and footer backgrounds will change to a yellow color along with that new orange border. It's the same background color as the library programming navigation shows to help tie in the fact that you are not only doing test transactions, but it resolves all parts with the latest test versions when available.
This is the mode suitable to the programmer or tester of new documents and process flows before they are put into production.
Click on To Do from the main navigation bar to shows all active transactions that are queued for you, or others authorized by a Group, to work on.
All work is shown grouped by the type of transaction, and then by package version if the report field mappings differ from one version to another. Several column headers are fixed:
- Party is the party name for the current processing step of the transaction.
- Status is the current transaction status.
- Last updated is the last updated date-time for the transaction.
- Role is the party's display name for the current processing step of the transaction.
Other columns are available to help describe the work in your To Do (such as the Email to and Subject). These customizable columns are defined in the Package's Map report fields. Check the Show To Do box to show the fields in the order specified.
You may re-order the columns by dragging the column header labels, or you can click on the cog icon that appears when you place your cursor over the table header to suppress a column. If you logoff, the listing customizations will be remembered when you next login.
To process a transaction, just click on it. This will open a new window for you to process the transaction. Close that window when you are done. When you click to process a transaction, is is automatically locked to you so that others who may be able to access that transaction because they are in the same To Do Group do not also attempt to process it. If you complete the step, the entry will leave your To Do queue, but if you decide not to complete it, it will remain in your queue to complete it later.
If a transaction in the To Do has been locked to you, and there is a To Do Group assigned (so others could potentially process it as well if it were not locked to you), an Unlock button will appear in the last column to allow you to unlock the transaction so others in the To Do Group can then process it.
Click the Refresh button to update the list, such as after processing some work or to check for new work.
For users who belong to a group that has Manage To Do permission for the member users of a group, a drop down box will appear next to the Refresh button that will allow you to see the To Do queue of other users. This is generally used to handle transactions for a user who is no longer active or perhaps is on vacation. The user list will by default include all users, including disabled user accounts. If you only care about active users, check the box 'Suppress disabled users'.
To use To Do, do the following:
- Check if there is an existing Group of users (listed under Access control) defined that represents the people who will play the role of the party? If not, create one like the most similar existing group and update the users who belong in it.
- Inside the Library, under the Parties, create a new Party and set the "To Do Group" to the group determined in step 1.
- In the Package, select the party listed in the package that needs access to the To Do. Then set its "To Do Party EsfName" to be the party created in step 2.
To start a transaction, click the Start transaction menu to list transactions you are authorized to start manually.
Click on the transaction name to start that transaction using your currently selected mode. A new window will pop up to allow you to work on that transaction. Close that window when you are done. If the transaction allows it, you can delete it from the package's document list using the Delete this transaction button. The package document list is either the first page you see, or while in edit mode, you can click on the Return to the document list button to show it.
Note, some transactions may not be started by users, and those will not be listed here. Some transactions are configured to be started by External users, parties who are not logged in, such as transactions that are started by your customers who visit your web site or are started via integration of existing applications you have.
See our YouTube video on starting a transaction.
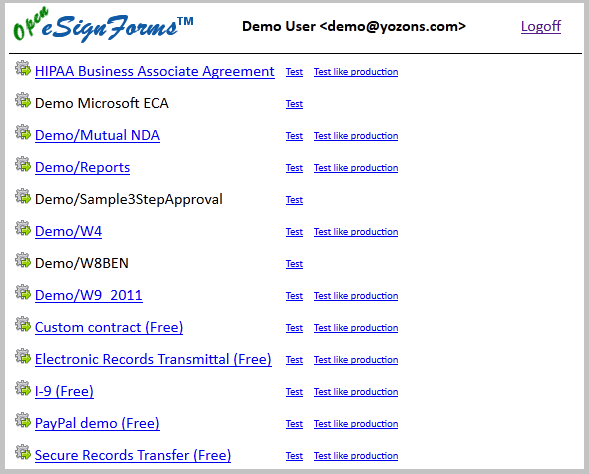
There are instances where using the sophisticated Web 2.0 interface is not suitable for all users. Just add /start/ to your login URL (i.e. https://example.com/appname/start/ if you'd normally login at https://example.com/appname/) to get a listing of production-level transactions you can start.
If you have started a transaction, but never submitted it, it will be listed at the top in a To Do box so you can resume where you left off.
You will still have to login, but you will be presented with a list of transactions you can you start.
If the transaction name is an active link, it means you can run a PRODUCTION version by clicking on it. The transaction is started in an independent browser window.
You can also add additional start links for testing purposes by adding the param ESFTEST=Yes to the the URL above: /start/?ESFTEST=Yes. The listing above shows the added links to start the transaction in TEST or TEST LIKE PRODUCTION modes.
There are times when you need to mass start transactions using initial data stored elsewhere. When API integration will not work, if you can create a CSV file (comma separated value), you can use it to upload the initial data for starting any type of transaction. Whenever possible, use standard UTF-8 character set encoded CSV files.
First, be sure you have set the correct mode for test or production transactions, and then click Start transaction->CSV Upload. You can select any transaction type you are allowed to start.
The first line (header line) of the CSV file must be the list of field names to set. These fields must be valid EsfNames (generally, 1-50 letters and numbers and '_').
Each subsequent data line of the CSV file represents the initial data to start a transaction. The header line specifies the field names to set, while the data line has the values to set those fields to. Blank lines are ignored, as are those that start with //## (a way to comment out a line if you don't want to use it). Finally, any line starting with ,, will be treated as "end of file" and no subsequent lines will be processed. Whitespace before and after a value is trimmed.
Example CSV file contents:
companyName,firstName,lastName,phone,ccv,todayDate,amount,quantity,percent
"Company1","First1","Last1","800-555-1111","111",01/01/14,"100.11","1",1.00%
"Company2","First2","Last2","800-555-2222","222",02/02/14,"200.22","2",2.00%
In the above case, when you upload that file, you specify which transaction type to start, and then it will start 2 transactions with the initial data coming from the CSV file, so companyName=Company1, firstName=First1, etc. would be used to start the first transaction, and companyName=Company2, firstName=First2, etc. would be used to start the second transaction., etc.
- If your transaction has been setup so the first party is assumed to be an automated party, check Auto complete first party? and the data posted will be validated per the setup for the first party. If unchecked, the transaction is started, but it will not complete the first party and you will have to complete them otherwise, such as via the To Do list.
- Select the Transaction type to start.
- Click Upload CSV file to select and upload a CSV file from your computer.
It will then show you the header line and number of data rows found. If all looks okay, click the Start N transactions button.
Please take care to ensure your CSV files are valid and tested to avoid creating a large number of "bad/invalid" transactions.
To list reports you are allowed to run, click on the Reports menu item. Click on one listed to run that report.
All reports are custom-built, but this example explains the main search criteria and capabilities.
See the Point & Click Programmer's Guide for details on mapping data fields from your packages to report fields, and for building a custom report that includes such report fields.
By default, users with permission to run the report can view transactions they started or they were a party to. Additional permissions can be set in Report Template to allow these to be expanded to "any user" the report runner can list. A user must have List permission to a transaction template specified in the report to see any such transactions of that type.
Reports allow you to view the data stored in documents in your transactions, as well as provide basic control and monitoring of the related transactions themselves.
See our YouTube video on reports, which includes configuring them as well as running them.
Below is a typical search and filtering control for reports.
The search will select production transactions if your current mode is PRODUCTION: Live, otherwise it will list test transactions. You can also search for transactions based on who started them, or who was a party to them.
- Select Any transaction type when you'd like to report on all transaction types defined for this report in which you have List permission and are listed below the "Any" entry. You may also select one or more specific transaction types to narrow the results.
- Enter an email address, or partial email address, in the Party email field to limit records to those transactions in which one of the parties is associated with a matching email address.
- Enter a unique transaction id in the Tran id only search field to search for a particular transaction. This mode skips all other search criteria, but of course the transaction found must be one of the types listed for the report.
- Click either the Started by or the Party to tab to determine if you'd like to search by who started the transactions, or who was a party to the transactions.
- For Started by, select Started by external parties to find only those transactions started by external parties, those users who do not have a login and typically created the transaction by starting from your company's web site. The "external parties" option is only available if the report has authorized you to see them. You may also select Started by any user, if the report authorizes you to do so, to include all users (those listed below this entry). To see transactions started by other users, the report running user must have List and List Users permissions on the group(s) that contain the users who start the transactions. You may select Started by me to include transactions that you started (this is the default access). And if additional users are listed below that, you may select individual users. Multiple selections are allowed.
- For Party to, select Any user a party to, if the report authorizes you to do so, to find those transactions in which any of the users (also listed individually) were a party to it. Select I was a party to to find only those you were a party to. If additional users are listed below, you may select individual users. Multiple selections are allowed.
- Check In progress to include transactions that are currently in progress.
- Check Completed to include transactions that have been completed.
- Check Suspended to include transactions that have been suspended. A suspended transaction cannot be processed further until resumed.
- Check Only stalled to limit the report to transactions that have stalled; that is, transactions that are in progress, but have no active party (or the active party has no email address or related TO DO group associated with it -- if they are currently working on it, then it may not be truly stalled).
- Choose the which date associated with the transactions to use: Started means the date the transaction was started; Last updated means the date the transaction was last changed or in use by a party; Will cancel means the date the transaction is set to automatically cancel itself if it does not complete before; and Will expire means the date the transaction will expire and be removed from the database.
- For In date range choose from one of the options: Today will show matching transactions for the current date; Yesterday will show matching transactions from yesterday; Last 7 days will show matching transactions for the last 7 days; Last 30 days will show matching transactions for the last 30 days; Last 90 days will show matching transactions for the last 90 days; Last 365 days will show matching transactions for the last 365 days; or Date range will let you choose your own date range starting from the From date through the To date fields.
- For Find limit choose the maximum number of matching records to retrieve. By default, 25 matching transactions are found and listed for online review. After a find, the Find matching button will be updated with the number found. You may list up to 300 records for online review. For larger result sets, choose 'Unlimited (download only)' for the List limit and you will be able to download matching records in a CSV file, as a transaction archive, or as a PDF archive, provided you also have permission to do these.
In this example, the custom report also allows for additional fields from your data to be searched in addition to the standard search fields.
Click the Find matching button to generate the report based on matching transactions. The list of matching transactions will appear below. You can also press ENTER to run a report.
Assuming at least one matching transaction was found, and you have permission, two to four additional buttons appear. Click Export to Excel to copy the data listed in your report into a Microsoft Excel spreadsheet. Click Download CSV to copy the data listed in your report into a standard Comma-Separated-Value text file, most of which are also easily imported in a spreadsheet, which can then be used to upload that data into other systems. Note that you can re-arrange the fields, or hide some, and they will then appear in the same way in your Excel or CSV files. Click Download archive to download the transactions in a ZIP file for long-term storage and review offline (without access to the service). Non-data button columns in the report are not included as they have no data value associated with them. Click Download PDFs to download the transactions PDFs (all latest documents combined into a PDF) along with all uploaded files in a ZIP file for long-term storage and review offline (without access to the service). Downloading PDFs can take time to generate the PDFs for each listed transaction.
You may re-order the columns by dragging the column header labels, or you can click on the cog icon that appears when you place your cursor over the table header to suppress a column. If you logoff, the report listing customizations will be remembered when you next login.
NOTE: If you need to run very large reports (lots of columns and/or lots of transactions selected), you may find that the CSV download API, the Download Transaction Archive API, or the Download Transaction PDFs API method to retrieve this data will be necessary.
NOTE for Download Transaction PDFs: Since all listed transactions will be converted to a PDF (combining all of the latest documents), along with any uploaded files (attachments) to the transaction, unique PDF names are important so your download makes sense. Use the package's PDF download file name spec so ensure meaningful names, such as using ${document.fieldName} specs along with the package name. For simple unique names, you can use the field spec ${transaction:id} but that likely will not carry much meaning when looking at the listing of download PDFs.
Click on any transaction row to bring up details and additional controls regarding the transaction. Again, many of these capabilities are configured in the report template to be limited to only authorized users.
Fields that allow text field searching are case insensitive.
By default it will perform a 'contains' search, meaning that data matches if what you enter is anywhere in the data. So searching for cat would match cat, catamaran, scatter and fatcat.
Use a '=' prefix for exact email match. Searching for =cat would match cat, but nothing else. If it's just '=' it will match only blank values.
Use a '^' prefix for a starts with match. Searching for ^cat would match cat and catamaran, but not scatter or fatcat.
Use a '!' prefix (only allowed as first character) to negate the match: '!=' means "not an exact match", just '!cat' means "not contains 'cat', and '!^' means "not starts with". If it's just '!=' it will match only non-blank values.
Use a '|' between multiple values to match to mean 'OR'. So 'abc|123' searches for values that contain 'abc' or '123'. This can be used for exact matches, prefix matches and for negated matches (though the condition becomes 'AND' for negated searches).
Generally, you can hover your mouse over such a field for a tips reminder. If it doesn't show these options, it is limited to only a default 'contains' search.
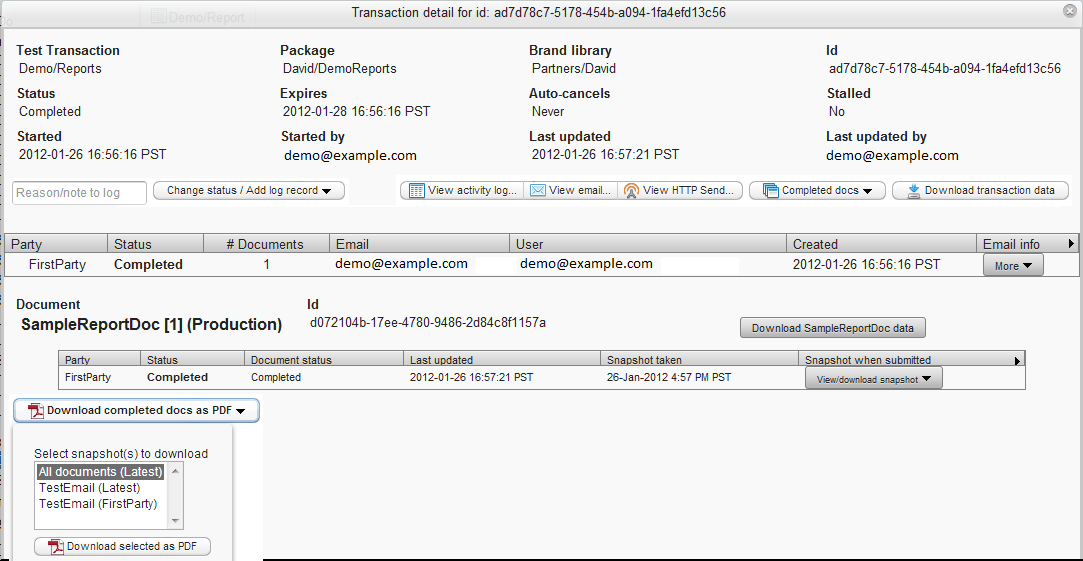
Below is a typical detail screen for a transaction:
- The upper left field will either be Test Transaction if it's a test transaction, or Production Transaction if it's a production transaction. Under it is the transaction template name, or type.
- The Package field shows the name of the package defined for the transaction template.
- The Brand library field shows the name of the branding library defined for the transaction template.
- The Id field show the transaction id. It is also shown in the window's title bar.
- The Status field specifies if the transaction is in progress, completed, canceled, or suspended.
- The Expires field shows the date, if any, this transaction is set to expire and be deleted.
- The Auto-cancels field shows the date, if any, this transaction is set to cancel itself if it's not completed by then.
- The Stalled field shows the date the transaction stalled; that is, when it was detected that the transaction is still in progress, but there are no active parties to move it along.
- The Started field shows the date and time the transaction was started.
- The Started by field shows the user, if any, who started the transaction.
- The Last updated field shows the date and time the transaction was last updated.
- The Last updated by field shows the user, if any, who last updated the transaction.
The Reason/note to log field can be populated and then click the Change status / Add log record button next to it to choose from the action type to take: Add reason/note to log (no status change) is used to simply add a comment to the log for this transaction; Cancel transaction will cancel the transaction if it's currently in progress; Suspend transaction will suspend the transaction if it's currently in progress; Cancel suspended transaction will cancel the currently suspended transaction; Resume suspended transaction will re-activate the suspended transaction so it's in progress again; Re-activate canceled transaction will re-activate a canceled transaction so it's in progress again, as well as reset the expiration date back to the related transaction template's retention specification.
The View activity log button will popup an activity log (see below for more) that shows all actions taken with respect to the transaction, as well as any user-defined log records.
The View email button will popup a window that lists all emails sent related to this transaction, as well as any correlated replies or bounces. See the view user email information in the system administrator guide for any details.
The View SMS button will popup a window that lists all text messages sent related to this transaction. See the view user SMS information in the system administrator guide for any details.
The View HTTP Send button will popup an activity log for all HTTP Send actions including the request sent and the response received. See the HTTP send log for details.
The Completed docs dropdown button allows you to view any completed document (by specific party, or "latest" to get the latest version of a given document). The document viewed is the same one the party saw when submitting it.
The Download transaction data button will download, as XML data, all of the data fields stored in the transaction. Typically, this is all related parameters that were posted at the time the transaction was created.
The Party List shows each party to the transaction, including the status, number of documents, email address (if known), user who process as this party (if any), when the party was created, and a More button related to emails. If you click the More button, there will be an option to View email to see the emails for this party, View SMS to see the text messages for this party, and Send email/SMS again to send the email or SMS invitation associated with the party again, and if the party is still active, you can enter a New email address or New SMS phone to transfer the party to a new email address or phone should the original email address or phone have been incorrect or you learned another person needs to process it; setting a new email address or phone will automatically cause the email or SMS to be sent out.
The Document List shows each document by name/version, Document Version ID and Transaction Document ID, whether the document was a Production or Test version, and the status of each party with respect to that document, including the party status, document status, last updated date and when the document and data snapshot was taken. The Download document data button can be used to download the data currently stored in the document in XML format. If the document had files uploaded to it, the Uploaded files button can be used to download any of those files. If a snapshot exists, a View/download snapshot button appears and you can click to choose to View document snapshot to see the document at the time that party completed/signed it; View document snapshot as PDF to view that same document as a PDF file; View data snapshot to view the XML data in the document at the time the party completed it; and Download Snapshot XML to download the full snapshot and digitally signed data and document.
There's an option to select one or more documents (either the latest version or the version after a particular party completed it) and download them together as a PDF file. Just select which documents are of interest, then click the Download selected as PDF button.
Lastly, there's an Estimated transaction size that computes a reasonable, estimated size of the transaction and all its related data and audit trail.
Note that for those transactions that fully skip documents (meaning all parties to the document were skipped) defined in the package, those skipped documents are not listed above. Instead, they are shown in a small list at the bottom so they don't "disappear" from the listing, but don't interfere with the list of documents that are being processed. (Skipped documents are generally in packages that have multiple flavors and only one -- or a subset -- are chosen. An obvious example in human resources are the state tax forms, in which the employee only fills out for the state where they live/work and those belonging to other states are skipped.)
You can use the report's transaction activity log to follow every step the transaction has taken:
Select the From date and To date to narrow the range, or leave both blank to include the oldest through the newest records. Check General to include general log records, those that relate to the basic process flow. Check Basic trace to include more details about the processing steps. And check Detail trace to include the most details about the processing steps. The latter two are particularly important when programming test transactions to determine what may be wrong with your configuration. You may also search for a particular string in the Log record contains field. Click the Find matching button to list up to 20,000 matching log records related to the transaction.
You can see the HTTP send requests and responses by clicking on the View HTTP Send button from the transaction detail page.
Each request and response is listed, with the response tied under the request. Click on a row to view the request information and parameters, or the response values. The request is considered completed when it gets a successful response or has used up all of its attempts with failure responses.
If you download the data associated with a transaction, you will receive something like the following, which includes all parameters for initial values and related information about how the transaction was started. Basically, most are interested in the set of <nameValue> elements listed under the <nameValues> element of the <esfRecord root element.
<esfRecord xmlns="http://open.esignforms.com/XMLSchema/2009">
  <id>60be4b7b-f03c-46dd-b362-ae4a1ee10e52</id>
  <esfname>data</esfname>
  <encrypt>true</encrypt>
  <compress>true</compress>
  <nameValues count="24">
    <nameValue>
      <name>ESF_Request_RequestURL</name>
      <value>http://open.esignforms.com/demo/S/Demo/Reports</value>
    </nameValue>
    <nameValue>
      <name>ESF_Request_QueryString</name>
      <value>
tid=5c5df880-7476-44e9-8c2e-06f3a591b69e&ESFTEST=Yes&ESFLIKEPRODUCTION=Yes
      </value>
    </nameValue>
    <nameValue>
      <name>ESFTEST</name>
      <value>Yes</value>
    </nameValue>
    <nameValue>
      <name>ESF_Request_Header_user_agent</name>
      <value>
Mozilla/5.0 (Windows NT 6.1; WOW64) AppleWebKit/535.7 (KHTML, like Gecko) Chrome/16.0.912.77 Safari/535.7
      </value>
    </nameValue>
    <nameValue>
      <name>ESF_Request_Header_accept</name>
      <value>
text/html,application/xhtml+xml,application/xml;q=0.9,*/*;q=0.8
      </value>
    </nameValue>
    <nameValue>
      <name>ESF_Started_By_User_Family_Name</name>
      <value>Demo last name</value>
    </nameValue>
    <nameValue>
      <name>ESF_Request_Header_referer</name>
      <value>
http://open.esignforms.com/demo/vaadin/;jsessionid=A0E4134A327E3AFCCD57480293FE63AD
      </value>
    </nameValue>
    <nameValue type="uuid">
      <name>ESF_Started_By_User_Id</name>
      <value>7a4d38ce-7457-406f-9fb0-c174d2bc997c</value>
    </nameValue>
    <nameValue>
      <name>ESF_Request_Header_connection</name>
      <value>keep-alive</value>
    </nameValue>
    <nameValue>
      <name>ESF_Request_Header_host</name>
      <value>open.esignforms.com</value>
    </nameValue>
    <nameValue>
      <name>ESFLIKEPRODUCTION</name>
      <value>Yes</value>
    </nameValue>
    <nameValue type="datetime">
      <name>ESF_Completed_Timestamp</name>
      <value>2012-01-27T00:57:21Z</value>
    </nameValue>
    <nameValue type="emailaddress">
      <name>ESF_Started_By_User_Email_Address</name>
      <value>"Demo user" <demo@example.com></value>
    </nameValue>
    <nameValue>
      <name>ESF_Started_By_User_Personal_Name</name>
      <value>Demo</value>
    </nameValue>
    <nameValue type="datetime">
      <name>ESF_Start_Timestamp</name>
      <value>2012-01-27T00:56:16Z</value>
    </nameValue>
    <nameValue>
      <name>ESF_Request_Header_accept_encoding</name>
      <value>gzip,deflate,sdch</value>
    </nameValue>
    <nameValue>
      <name>ESF_Started_By_User_Email</name>
      <value>[email protected]</value>
    </nameValue>
    <nameValue type="esfname">
      <name>ESF_Completed_Party</name>
      <value>FirstParty</value>
    </nameValue>
    <nameValue>
      <name>ESF_Request_Header_cookie</name>
      <value>
JSESSIONID=A0E4134A327E3AFCCD57480293FE63AD; ce=demo%40example.com; __utma=148663459.1851346224.1282586987.1285177947.1300488096.3; __utma=77754314.164675453.1306035270.1312051316.1317158170.129; __utmz=77754314.1306035270.1.1.utmcsr=(direct)|utmccn=(direct)|utmcmd=(none)
      </value>
    </nameValue>
    <nameValue>
      <name>ESF_Request_RemoteAddr</name>
      <value>50.46.122.56</value>
    </nameValue>
    <nameValue>
      <name>tid</name>
      <value>5c5df880-7476-44e9-8c2e-06f3a591b69e</value>
    </nameValue>
    <nameValue>
      <name>ESF_Request_Method</name>
      <value>GET</value>
    </nameValue>
    <nameValue>
      <name>ESF_Request_Header_accept_language</name>
      <value>en-US,en;q=0.8</value>
    </nameValue>
    <nameValue>
      <name>ESF_Request_Header_accept_charset</name>
      <value>ISO-8859-1,utf-8;q=0.7,*;q=0.3</value>
    </nameValue>
  </nameValues>
</esfRecord>- ESF_Start_Timestamp is the date-time it was created.
- ESF_Started_By_User_Id is the user id of the person who started this transaction if it was started by a logged in user.
- ESF_Started_By_User_Email is the email address of the person who started this transaction if it was started by a logged in user.
- ESF_Started_By_User_Email_Address is the full email display name and email address of the person who started this transaction if it was started by a logged in user.
- ESF_Started_By_User_Personal_Name is the first/personal name of the person who started this transaction if it was started by a logged in user.
- ESF_Started_By_User_Family_Name is the last/family name of the person who started this transaction if it was started by a logged in user.
-
paramName is the value of the named parameter passed at startup (X prefix is needed if original param started with a number; '-', '/' or '.' replaced by '
_'). - ESF_Request_Header
_headerName is the value of the named header passed at startup ('-', '/' or '.' replaced by '_'). - ESF_Request_Method is 'GET' or 'POST' based on type of original startup HTTP request.
- ESF_Request_ContentType is the HTTP request's mime-type/content-type when specified.
- ESF_Request_RequestURL is the HTTP request's original URL.
- ESF_Request_QueryString is the HTTP request's query string portion of the URL.
- ESF_Request_RemoteAddr is the HTTP request's remote address (typically an IP address).
If you download the data associated with a document, you will receive something like the following:
<esfRecord xmlns="http://open.esignforms.com/XMLSchema/2009">
  <id>bc313161-7891-47ae-96f4-3af98c4cb9b2</id>
  <esfname>SampleReportDoc</esfname>
  <encrypt>true</encrypt>
  <compress>true</compress>
  <nameValues count="6">
    <nameValue type="money">
      <name>desiredSalary</name>
      <value>50000</value>
    </nameValue>
    <nameValue type="integer">
      <name>yearGraduatedHighSchool</name>
      <value>1998</value>
    </nameValue>
    <nameValue type="date">
      <name>dob</name>
      <value>1980-01-02</value>
    </nameValue>
    <nameValue>
      <name>ssn</name>
      <value>123456789</value>
    </nameValue>
    <nameValue>
      <name>lastName</name>
      <value>Franklin</value>
    </nameValue>
    <nameValue>
      <name>firstName</name>
      <value>Ben</value>
    </nameValue>
  </nameValues>
</esfRecord>The general transaction search feature is very similar to Reports, except that is has fixed fields in the listing instead of custom field selections. This feature provides full access to the transaction and thus has less control than with custom reports. It is recommended this feature only be given to system administrators or other power users who have full control over the transactions they can list.
This view provide basic control and monitoring of transactions that a user has List permission to view.
Below is a typical search and filtering control for general transaction search.
- If your current mode is PRODUCTION: Live then you will search for production transactions, otherwise it will search for test transactions.
- Select one or more transaction types you'd like to list (only those transactions you are allowed to List are shown).
- Choose your date range starting from the From date through the To date fields.
- Enter a unique transaction id in the Tran id only search field to search for a particular transaction. This mode skips all other search criteria, but of course the transaction found must be one of the types allowed.
- Enter a unique party pickup code in the Party pickup code only search field to search for a particular transaction by a party's pickup code. This mode skips all other search criteria, but of course the transaction found must be one of the types allowed.
- Enter an email address, or partial email address, in the Party email field to limit records to those transactions in which one of the parties is associated with a matching email address.
- Check In progress to include transactions that are currently in progress.
- Check Completed to include transactions that have been completed.
- Check Suspended to include transactions that have been suspended. A suspended transaction cannot be processed further until re-activated.
- Check Only stalled to limit the report to transactions that have stalled; that is, transactions that are in progress, but have no active party.
Click the Find matching button to generate the listing based on matching transactions. The list of matching transactions will appear below.
Click on any transaction row to bring up details and additional controls regarding the transaction. This is the same function as for report transaction details shown above, except all buttons are enabled to provide full access to the transaction.
See report transaction details for details on this function.
See report transaction activity log for details on this function.
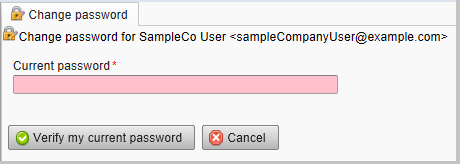
To change your password, as well as the forgotten password question and answer, you will be presented with this view:
Enter your current password, then click the Verify my current password button to see the set password view:
Enter your new password or phrase two times to ensure you have typed the expected value. The password will be masked like a regular password field and is a phrase that can be a mix of letters, numbers, spaces and special characters. It is case sensitive. We recommend longer pass phrases, such as 10 characters or more, over shorter ones, even if the shorter one seems more cryptic.
Your original question will be shown. Ensure it is a good question that the system can ask you if you ever forget your password and need to reset it and enter that in the Question to ask you should you forget your password field. Provide the corresponding answer in the Answer you will have to provide to reset your password field. Unlike a password, the answer will be displayed, so please do this in private. Answers are not case sensitive and special characters are ignored. This is essentially a "second password" so make sure the question and related answer are not too easily guessed should anybody ever attempt to reset your password while they have access to your email account.
Click the Change my password button once you have completed the form. Click the Cancel button to keep your current password.
Note that an email will be sent to you every time your password is changed, so if you did not just change your password, it is an indication someone may be accessing your account without authorization.
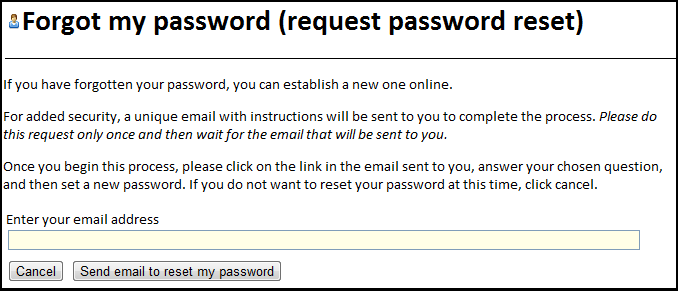
If you have forgotten your password, shame on you! But assuming you set up a useful question and answer, you should be able to choose a new password automatically.
From the login page, click the Forgot your password? link to show this page:
Type in the email address you use to login, then click the Send email to reset my password button.
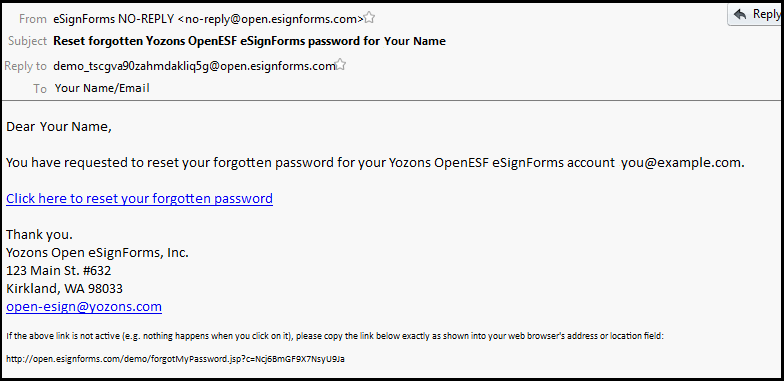
Then, check your email for a unique link that is sent to you to continue with the reset process. This step prevents people who do not control your email account from even attempting to reset your password. You should receive an email like the following:
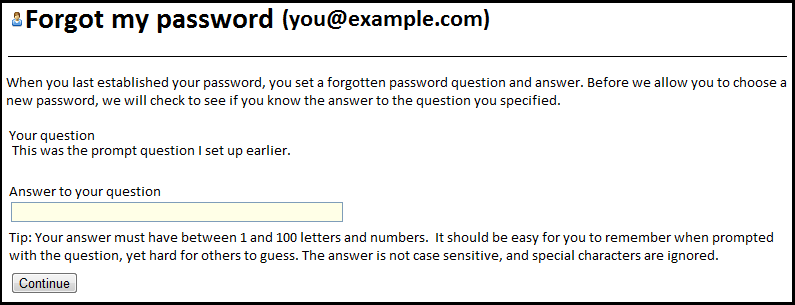
Click on the link in the email and you will be presented with the question you set up when you set your password like the following:
Type in the answer to your question. Note that it will be displayed, so do this in private. Unlike a password, the answer is not case sensitive and non-alphanumeric characters (letters and numbers) are ignored. Click the Continue button.
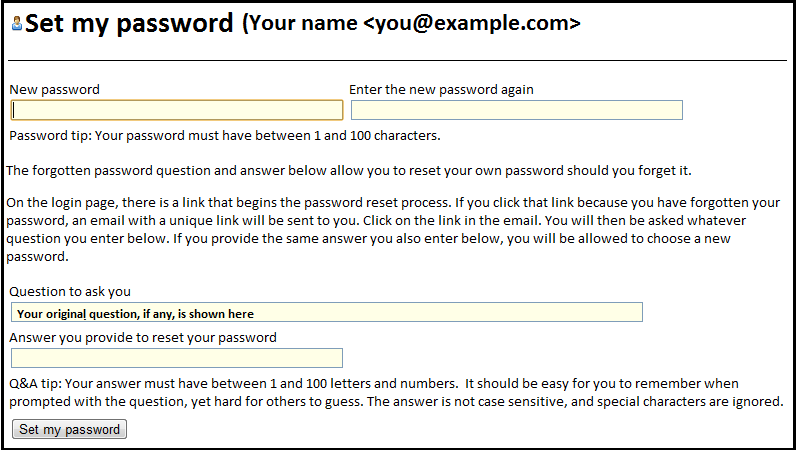
Assuming you gave the correct answer, you will then be prompted to set a new password as well as a new forgotten question and answer. The previous question will be auto-filled, but you can change it or keep it, and you will have to provide the answer again regardless. This is the standard page to Set my password.
To set your password, as well as the forgotten password question and answer, you will be presented with this page:
Enter your password two times to ensure you have typed the expected value. The password will be masked like a regular password field and is a phrase that can be a mix of letters, numbers, spaces and special characters. It is case sensitive. We recommend longer pass phrases, such as 10 characters or more, over shorter ones, even if the shorter one seems more cryptic.
Think up a good question that the system can ask you if you ever forget your password and need to reset it and enter that in the Question to ask you should you forget your password field. Provide the corresponding answer in the Answer you will have to provide to reset your password field. Unlike a password, the answer will be displayed, so please do this in private. Answers are not case sensitive and special characters are ignored. This is essentially a "second password" so make sure the question and related answer are not too easily guessed should anybody ever attempt to reset your password while they have access to your email account.
Click the Set my password button once you have completed the form. If successful, click on the login now link displayed and you can begin to use the application.
Note that an email will be sent to you every time your password is changed, so if you did not just change your password, it is an indication someone may be accessing your account without authorization.
In order to keep your user account safe should you stop using it, or if you just close your browser without logging off first (a no-no! -- always logoff when you are done), the application will automatically log you off if you have not had any recent activity. Clicking on most areas of the application will keep your session active, with the last server access shown at the bottom. The system administrator can set how long a user session is, but it defaults to 30 minutes.
If you click on something and see the following:
it means your session expired due to lack of recent usage. Note any changes you may have made (if they were not already saved, they will be lost) and click on the red box to continue and [#Login login again].
It is possible that while you were logged in, your application was restarted, such as for a new release, to resolve a bug, or because of some error on the system or application code.
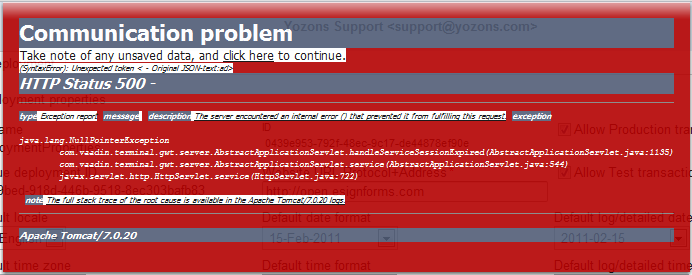
If you click on something and see the following (or any other red box error):
it means your session was terminated unexpectedly. Note any changes you may have made (if they were not already saved, they will be lost) and click on the red box to continue and login again.
It is possible for errors to occur, including various user-errors such as accessing a broken link, trying to start a transaction they do not have permission to, accessing a package after it's been transferred to another party, etc.
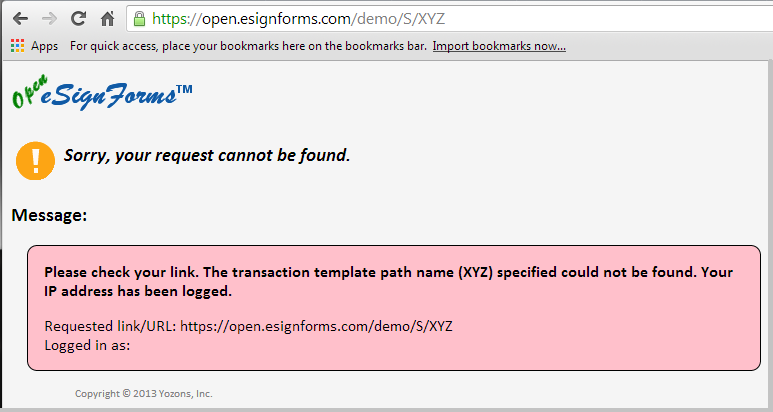
When such errors occur, you will see a page like this:
Under the logo is the general error that occurred, such as "request not found" (bad URL generally), "invalid request", "request not allowed" (no permission), or an expected application error.
In the box is a more detailed explanation of what went wrong. It generally includes the link/URL that was used (in case it doesn't match what you expected to have used), and if you are logged in, it will tell you who are are logged in as.
Documentation for eSignForms by Yozons Inc.
